
Product Info

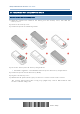
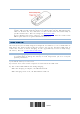
Table Of Contents
- Important Notices
- Introduction
- Quick Start
- Understanding the Barcode Scanner
- 1.1 Battery
- 1.2 Memory
- 1.3 LED Indicator
- 1.4 Beeper
- 1.5 Vibrator
- 1.6 Send “NR” to Host
- 1.7 Scan Modes
- 1.8 Scanning Timeout
- 1.9 Delay between Re-read
- 1.10 Read Redundancy for All Symblogies
- 1.11 Addon Security for UPC/EAN Barcodes
- 1.12 Negative Barcodes (1664 Only)
- 1.13 Use Direct USB Cable
- 1.14 Picklist Mode (1664 Only)
- 1.15 Pager Beep Duration
- 1.16 Time Stamp
- 1.17 2D Decode Setting (1664 Only)
- 1.18 Hardware Reset
- 1.19 Mobile Phone/Display Mode
- 1.20 Serial Number Stamp
- Selecting Output Interface
- 2.1 Bluetooth® HID
- 2.1.1 Activate Bluetooth® HID & Select Keyboard Type
- 2.1.2 Reset Connection
- 2.1.3 Keyboard Settings
- 2.1.4 Inter-Character Delay
- 2.1.5 Inter-Function Delay
- 2.1.6 HID Character Transmit Mode
- 2.1.7 Special Keyboard Feature
- 2.1.8 Keypad Support for iPhone/iPad
- 2.1.9 HID Keyboard Layout (Apple & Non-Apple System)
- 2.1.10 Transmit Speed
- 2.1.11 BT HID Slave/Master Switching
- 2.1.12 BT HID Auto-Reconnection
- 2.2 Bluetooth® SPP Slave
- 2.3 Bluetooth® SPP Master
- 2.4 USB HID via 3610 A
- 2.5 USB Virtual COM via 3610 A
- 2.6 Direct USB HID
- 2.7 Direct USB Virtual COM
- 2.1 Bluetooth® HID
- Set up a WPAN Connection
- Change Symbology Settings
- 4.1 Codabar
- 4.2 Code 25 – Industrial 25
- 4.3 Code 25 – Interleaved 25
- 4.4 Code 25 – Matrix 25
- 4.5 Code 25 – Chinese 25
- 4.6 Italian Pharmacode (Code 32)
- 4.7 Code 39
- 4.8 Trioptic Code 39
- 4.9 Code 93
- 4.10 Code 128
- 4.11 GS1-128 (EAN-128)
- 4.12 ISBT 128
- 4.13 GS1 DataBar (RSS Family)
- 4.14 MSI
- 4.15 EAN-8
- 4.16 EAN-13
- 4.17 UCC Coupon Extended Code
- 4.18 UPC-A
- 4.19 UPC-E
- 4.20 Code 11
- 4.21 Composite Code
- 4.22 US Postal Code
- 4.23 UK Postal Code
- 4.24 More Postal Code
- 4.25 2D Symbologies
- 4.26 Macro PDF
- Defining Output Format
- Applying Formats for Data Editing
- Specifications

3
Update
Note: (1) To turn off the scanner, press the [Power/Delete] key for 2 seconds.
The
scanner will respond with two short beeps (high tone) and the LED will become
solid red. Release the key. Otherwise, let the scanner turn off automatically in
specific circumstances. Refer to settings of “
Auto Power Off”.
(2) For shipping and storage purposes, remove the battery from the scanner. This
will keep the batteries in good condition for future use.
CHARGE THE BATTERY
The battery may not be fully charged for shipment. For initial use, it is recommended to
fully charge the battery before using the scanner. You can use the Direct USB cable to
connect the scanner to PC for charging. It takes approximately 4 hours to fully charge
the battery. Refer to 1.13 Use Direct USB Cable
.
Note: Battery charging stops when the temperature drops below 0°C or exceeds 40°C. It
is recommended to charge the battery at room temperature (18°C to 25°C) for
optimal performance.
1) Install the battery to 1662/1664.
2) Connect 1662/1664 to host computer or notebook via the USB cable.
3) The scanner LED will flash red during charging.
When the charging is complete, the LED will turn off.
When charging errors occur, the LED will turn solid red.