
User Manual
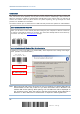

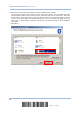
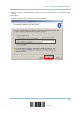

Table Of Contents
- IMPORTANT NOTICES
- RELEASE NOTES
- INTRODUCTION
- QUICK START
- UNDERSTANDING THE BARCODE SCANNER
- SELECTING OUTPUT INTERFACE
- SETTING UP A WPAN CONNECTION
- CHANGING SYMBOLOGY SETTINGS
- 4.1 CODABAR
- 4.2 CODE 25 – INDUSTRIAL 25
- 4.3 CODE 25 – INTERLEAVED 25
- 4.4 CODE 25 – MATRIX 25
- 4.5 CODE 39
- 4.6 CODE 93
- 4.7 CODE 128
- 4.8 EAN-8
- 4.9 EAN-13
- 4.10 GS1-128 (EAN-128)
- 4.11 ISBT 128
- 4.12 MSI
- 4.13 FRENCH PHARMACODE
- 4.14 ITALIAN PHARMACODE
- 4.15 PLESSEY
- 4.16 GS1 DATABAR (RSS FAMILY)
- 4.17 TELEPEN
- 4.18 UPC-A
- 4.19 UPC-E
- DEFINING OUTPUT FORMAT
- APPLYING FORMATS FOR DATA EDITING
- SPECIFICATIONS
- Appendix I - FIRMWARE UPGRADE
- Appendix II - HOST SERIAL COMMANDS
- Appendix III - KEYBOARD WEDGE TABLE
- Appendix IV - NUMERAL SYSTEMS

84
Enter Setup
1560 Series Barcode Scanner User Guide
6. Wait for a few seconds for the Wizard to search available devices nearby.
The scanner will appear with its “serial number” as the device name. You may double-check the
“Serial Number” label on the scanner to ensure connecting with the correct scanner. Select the
target scanner. If the target scanner does not appear on the list, click [Search Again] to refresh
the list. The scanner might enter Suspend Mode now, and you can press the trigger to have it
active again (=discoverable). It will then stay active for 2 minutes and wait for PC to establish a
connection.
7. Click [Next].