
User Manual
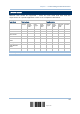
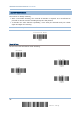
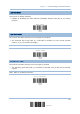
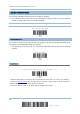


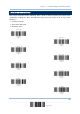
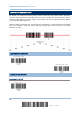
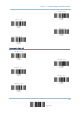
Table Of Contents
- IMPORTANT NOTICES
- RELEASE NOTES
- INTRODUCTION
- QUICK START
- UNDERSTANDING THE BARCODE SCANNER
- SELECTING OUTPUT INTERFACE
- SETTING UP A WPAN CONNECTION
- CHANGING SYMBOLOGY SETTINGS
- 4.1 CODABAR
- 4.2 CODE 25 – INDUSTRIAL 25
- 4.3 CODE 25 – INTERLEAVED 25
- 4.4 CODE 25 – MATRIX 25
- 4.5 CODE 39
- 4.6 CODE 93
- 4.7 CODE 128
- 4.8 EAN-8
- 4.9 EAN-13
- 4.10 GS1-128 (EAN-128)
- 4.11 ISBT 128
- 4.12 MSI
- 4.13 FRENCH PHARMACODE
- 4.14 ITALIAN PHARMACODE
- 4.15 PLESSEY
- 4.16 GS1 DATABAR (RSS FAMILY)
- 4.17 TELEPEN
- 4.18 UPC-A
- 4.19 UPC-E
- DEFINING OUTPUT FORMAT
- APPLYING FORMATS FOR DATA EDITING
- SPECIFICATIONS
- Appendix I - FIRMWARE UPGRADE
- Appendix II - HOST SERIAL COMMANDS
- Appendix III - KEYBOARD WEDGE TABLE
- Appendix IV - NUMERAL SYSTEMS

36
Enter Setup
1560 Series Barcode Scanner User Guide
1.9 EFFECTIVE DECODING AREA
By default, the effective decoding area is 100% covered by the scanned area. However,
you may narrow down the decoding area to prevent reading the wrong barcode when a
number of barcodes are printed closely. The scanner will only read barcodes that appear
in the effective decoding area.
Read the label “Centering On” and specify the percentage to narrow down the decoding
area. For example, read “Left 10%” and then “Right 30%” for the scanner to decode
barcode “A” only.
1.9.1 POSITIONING WINDOW
1.9.2 ADJUSTING WINDOW
Percentage for Left Half
Centering On
*
Centering Off
*Left 50%