
User Manual
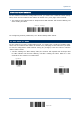
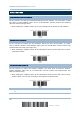

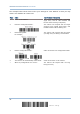

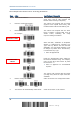
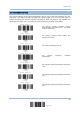
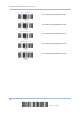
Table Of Contents
- IMPORTANT NOTICES
- RELEASE NOTES
- INTRODUCTION
- QUICK START
- UNDERSTANDING THE BARCODE SCANNER
- SELECTING OUTPUT INTERFACE
- SETTING UP A WPAN CONNECTION
- CHANGING SYMBOLOGY SETTINGS
- 4.1 CODABAR
- 4.2 CODE 25 – INDUSTRIAL 25
- 4.3 CODE 25 – INTERLEAVED 25
- 4.4 CODE 25 – MATRIX 25
- 4.5 CODE 39
- 4.6 CODE 93
- 4.7 CODE 128
- 4.8 EAN-8
- 4.9 EAN-13
- 4.10 GS1-128 (EAN-128)
- 4.11 ISBT 128
- 4.12 MSI
- 4.13 FRENCH PHARMACODE
- 4.14 ITALIAN PHARMACODE
- 4.15 PLESSEY
- 4.16 GS1 DATABAR (RSS FAMILY)
- 4.17 TELEPEN
- 4.18 UPC-A
- 4.19 UPC-E
- DEFINING OUTPUT FORMAT
- APPLYING FORMATS FOR DATA EDITING
- SPECIFICATIONS
- Appendix I - FIRMWARE UPGRADE
- Appendix II - HOST SERIAL COMMANDS
- Appendix III - KEYBOARD WEDGE TABLE
- Appendix IV - NUMERAL SYSTEMS

12
Enter Setup
1560 Series Barcode Scanner User Guide
The example below shows how to save your settings as “User Default” so that you may
restore user defaults at a later time:
Steps
Action User Feedback if Successful
1 Power on the scanner…
T
he scanner will respond with a long beep
(high tone) and its LED indicator will
become solid red and go off quickly.
2 Enter the Configuration Mode…
T
he scanner will respond with six beeps
(high-low tone repeats three times), and
its LED indicator will be flashing red.
3 Read a Setup label…
For example,
The scanner will respond with two beeps
(low-high tone) if reading a normal label.
4 Exit the Configuration Mode…
OR
Same as for Enter the Configuration Mode.
5 The scanner will automatically restart itself… Same as for Power on the scanner.
* When any configuration error occurs...
T
he scanner will respond with one long
beep (low tone).