
User Manual

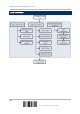
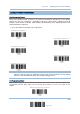

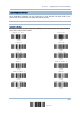
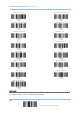

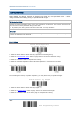
Table Of Contents
- IMPORTANT NOTICES
- RELEASE NOTES
- INTRODUCTION
- QUICK START
- UNDERSTANDING THE BARCODE SCANNER
- SELECTING OUTPUT INTERFACE
- SETTING UP A WPAN CONNECTION
- CHANGING SYMBOLOGY SETTINGS
- 4.1 CODABAR
- 4.2 CODE 25 – INDUSTRIAL 25
- 4.3 CODE 25 – INTERLEAVED 25
- 4.4 CODE 25 – MATRIX 25
- 4.5 CODE 39
- 4.6 CODE 93
- 4.7 CODE 128
- 4.8 EAN-8
- 4.9 EAN-13
- 4.10 GS1-128 (EAN-128)
- 4.11 ISBT 128
- 4.12 MSI
- 4.13 FRENCH PHARMACODE
- 4.14 ITALIAN PHARMACODE
- 4.15 PLESSEY
- 4.16 GS1 DATABAR (RSS FAMILY)
- 4.17 TELEPEN
- 4.18 UPC-A
- 4.19 UPC-E
- DEFINING OUTPUT FORMAT
- APPLYING FORMATS FOR DATA EDITING
- SPECIFICATIONS
- Appendix I - FIRMWARE UPGRADE
- Appendix II - HOST SERIAL COMMANDS
- Appendix III - KEYBOARD WEDGE TABLE
- Appendix IV - NUMERAL SYSTEMS

156
End Programming Format
1560 Series Barcode Scanner User Guide
6.2.4 DIVIDE DATA INTO FIELDS
Start Position
Data can be divided into fields in one of the following direction –
from head (F1) to tail (F5)
from tail (F1) to head (F5)
Field Adjustment
You may apply equal length to all fields, if necessary. It will add “Space” (0x20) to field when data
is found shorter than specified.
1. Read the label above to adjust field by length.
2. Read the “Decimal Value
” label on page 187 for the desired field length.
3. Read the “Validate” label on the same page to complete this setting.
Total Number of Fields
Data can be divided into at most 6 fields; each of them is numbered from F1 to F6 accordingly.
However, only F1~F5 can be configured.
The total number of fields must be specified correctly. If three fields are configured for the
editing format, the data characters after F3 will be assigned to F4 automatically. This feature is
quite useful especially when data of variable lengths is processed by editing formats.
*From Head
From Tail
Set Length to adjust
f
ields …
(
*0
)
*No Adjustment
*One Field