
User guide


Pocket Verifier • Smartphone Edition • User Guide and Tutorial 5 of 27
Main Index
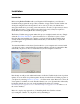
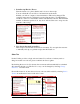
The Main Index screen is where you will start most of your transactions. From here you
can enter credit card transactions, cash sales, and account transfers. You can also go to
the Transaction Manager or setup various options from selecting Settings.
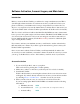
Program Settings and Options
Introduction
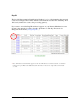
The settings menu can be accessed from the Main Index screen of Pocket Verifier. Once
you enter the Settings screen, most features can be turned on or off. The menu on the
right side also contains additional features that can be changed. Each of these is described
below.
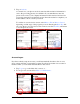
Special Considerations:
When you first start Pocket Verifier you will be asked to enter your settings after
activating and logging into your first merchant account.
It is important to note that some settings such as the header of footer for receipts are
specific to the merchant account that you logged into. To change the merchant from the
Settings page…
1. Select the Cancel menu to return to the Main Index.
2. Select Menu > Switch Accounts.
3. Change the merchant account.
4. Select the Logon menu.
5. Select Settings from the list.
You can now modify your merchant-specific settings as needed.
While the majority of your transactions will
be credit card related, you can also perform
cash sales and ACH account transfers *
from the right Menu screen.
You can go to the Account Logon screen
by selecting Switch Accounts… You can
also exit the program, check for program
updates, and display an About Box (to
check your program version number).
* ACH Account Transfers require ACH to
be activated on your merchant account.