
User manual


6.0 MENU AND PICTURE SETTING
R599810 - Blackwing mk2012 User Manual 31
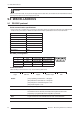
6.4.0.2 Adjust Area
Whole: the entire screen is selected for adjustment.
Zone: the screen is divided into 121 adjustment zones.
6.4.0.3 Adjust Color
Select the color to adjust: Red or Blue.
6.4.0.4 Adjust Pattern Color
Select a pattern to help the pixel alignment. Settings: White or Green+adjust Color.
6.4.0.5 Adjust (Pixel)
This function is enable when the Adjust Area is set to Zone only. You can adjust the
selected color position horizontally and vertically by 1-pixel steps.
H settings: -2 +2
V settings: -2 +2.
6.4.0.6 Adjust (Fine)
Use this function to move the selected color within smaller steps.
H settings: -31 +31
V settings: -31 +31
6.4.0.7 Reset
Reset all pixel adjustments to default factory settings.
Installation Style
Flip the image to the left or right, up or down according to the projection state of the projector:
Front, Ceiling Mount (F), Rear or Rear Ceiling mount (R)
Keystone
Compensate for trapezoidal distortion caused by installation. Independently to the screen orientation, make sure
that the projector is not tilt more than 5% left/right and 15% up/down.
•Vertical Keystone from -30 to +30.
• Horizontal Keystone from -40 to +40.
RCU SHORTCUTS DURING PIXEL ADJUSTMENT (BW2 & 3 ONLY):
[GAMMA] button on the RCU switches adjust color parameter between Red and Blue.
[PIC. ADJ.] button on the RCU switches the adjust area parameter between whole and zone. At the same time, the
zone cursor will appear on the adjust pattern.
[COLOR SPACE] button on the RCU changes the adjust pattern from white to green+adjust color.
Use the [COLOR TEMP] button on the remote control to change adjustment method from Pixel to Fine tune and
switch to the fine tune window.
[BACK] button will exit the Pixel Adjust mode.
NB: When a 3D signal is fed the Keystone is automatically set to 0 vertically and 0 horizontally.