
User manual


2.0 INSTALLATION GUIDELINES
R599810 - Blackwing mk2012 User Manual 13
the center of the screen.
• If the projector is not installed perpendicularly to the screen, use keystone correction to fulfill your screen. Note
that using keystone correction, may be disabled by 3D projection. If you want the best possible 3D pictures, It is
not recommended to use trapezoidal correction.
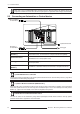
• If you plan to use the vertical and horizontal shifts without keystone correction, make sure to not exceed the
values contained in the tab below:
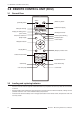
2.9.0.1 Adjust the picture position
The Blackwing mk2012 projector has motorized vertical and horizontal shifts. Browse into the Menu to the [Lens
Control] setting into the [Installation] menu, select the shift adjustment. Or use the direct access button on the
Remote Control Unit [Lens Control] to make the lens adjustment.
You can use self-generated test pattern of the projector or an external pattern, from a calibration DVD by example,
by setting the Adjust pattern option to Off.
2.9.0.2 Adjust the picture Zoom
Into the [Lens Control] menu, press the [Ok] button to access the [Zoom] adjustment. Use the up and down buttons
to adjust the picture size until the screen is completely filled.
2.9.0.3 Adjust the Picture Focus
From the [Lens Control] menu, press the [Ok] button to access the [Focus] adjustment. Use the up and down
buttons to adjust the picture focus
Using Lens Memories
You can save the current picture position, zoom and focus in up to 3 different Lens Memories. Each memory stores
the current position, zoom, focus of the lens and you can set a custom name up to 10 characters.
2.9.0.1 Saving current lens setup
Fist step is to set the lens to fill the desired screen. Then go into the Menu ⇒⇒
⇒⇒
Installation ⇒⇒
⇒⇒
Lens Control, Select Lens Memory Save and choose one of the three
memory available. You can call back anytime later this current lens setup using the
Direct access button [Lens Memory] on the RCU.
2.9.0.2 Limitations of use
Each memory can store a different picture size and position, but there are limitations
on the possible pictures sizes and positions because of the projector being at a fixed
lcoation. In order to calculate the best position of the projector toward the screen, the
installer has to make sure that among the different desired pictures, the smaller one
with the smaller zoom, is within the offset limits (horizontal and vertical shifts) of the
projector. Once the position of the projector is determined by the smallest possible
picture, double check that the larger one does not exceed the zoom capacity.
Left - Right shift 0% 5% 10% 15% 20% 25% 30% 34%
max. Up - Down shift 80% 74% 66% 57% 47% 34% 18% 0%