
User manual


8.0 ADJUSTING THE IMAGE
R599791 - FORCE 3D User Manual 67
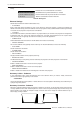
Horizontal keystone is used to correct a keystoned image shape in which the left and right borders of the image are
unequal in length, and the top and bottom are slanted to one of the sides, see Figure below.
Horizontal Keystone
All settings to adjust keystone are in the Geometry Correction submenu. Brightness Uniformity, Edge Blending and
Black Level Blending should be disabled before performing Keystone adjustments.
Adjusting an Image for Keystone Correction
1) Enable keystone adjustments by selecting Keystone from the Geometry Correction drop down list. NOTE: This
will enable the controls for performing 1D or 2D keystone adjustments.
2) Select a Test Pattern. NOTE: It is recommended to use the Grid test pattern.
3) Perform coarse keystone adjustment by using the Horizontal or Vertical Adjust setting. Use the left and right
arrow keys to make the adjustment. NOTE: The corner cursors are a guide as to how the image will be adjusted.
The outside edge of a cursor will be the outside edge of the image. It may not be possible to exactly match the
screen dimensions with the Horizontal and Vertical Keystone controls, but these settings can be refined when the
2D keystone settings are adjusted.
4) When adjustment of the corners is complete, select OK. NOTE: A message will be displayed indicating that the
projector is “Processing request”. The settings are applied to the displayed image, and will take approximately 10
seconds. If Vertical Keystone adjustments have been made, starting to do any Horizontal Keystone adjustments
will erase the Vertical settings, and vice versa.
5) After the Horizontal or Vertical adjustments have been made, selecting 2D Keystone adjustments will retain
these settings. Fine adjustment can now be made by moving any single corner separately.
6) Use the arrow keys to move to the required corner. NOTE: The current corner will be displayed in red.
7) Press ENTER to select the corner. NOTE: The current corner will be displayed in green.
8) Use the arrow keys to move the selected corner to match the screen.
9) Press ENTER again, to save that position for the corner.
10) Repeat Steps 6 to 9 to adjust all 4 corners until they match the screen.
11) Select OK to apply the new corner positions to the image. NOTE: A message will be displayed for
approximately 10 seconds indicating that the projector is “Processing request”.
Under certain combinations of extreme keystone co-ordinates and specific signal frequency, a keystoned image
may result that is outside the bandwidth limitations of the projector. When attempting to apply the keystone settings,
a message will pop up on the OSD, indicating that the bandwidth has been exceeded and the keystone cannot be
applied. The cursor co-ordinates for keystone adjustment will remain at the failed keystone position.
This will allow the user to make minor changes and attempt to reapply the corner settings. Either the coordinates
must be adjusted, or the free run frequency must be changed to fall within the allowed bandwidth.
The FUNC+HELP key combination will immediately disable the Keystone, Brightness Uniformity, Edge Blending
and Black Level Blending features. This is helpful when, in some extreme keystone configurations, some image
corruption may appear and/or the menus may not be readable. Although FUNC+HELP disables these features, it
will not overwrite their settings. If keystone is simply enabled again, the same image corruption may occur. After
pressing FUNC+HELP, it is recommend to immediately “Reset Keystone Settings”, which will set all keystone co-
ordinates to zero.
Brightness Uniformity
Brightness Uniformity provides further refinement of displays already matched for their primary colors and overall
light output. Use Brightness Uniformity to create an exceptionally smooth image in which no area appears brighter
than another. In the Brightness Uniformity menu, enable the Brightness Uniformity Enable check box to access a
multitude of adjustments for light output control in specific areas throughout the image.
Your settings apply as long as the Brightness Uniformity Enable check box is enabled. While making adjustments,
enable the Coarse Adjustment check box to apply Brightness Uniformity settings with a large granularity. Coarse
Adjustment helps identify brightness changes and accelerates projector response time while adjusting settings. To
disable the Brightness Uniformity function, delete the Brightness Uniformity Enable checkmark.
What is Brightness Uniformity
When used to refine screens already matched for their primary colors: Matching Colors in Multiple Screens and
overall light output, proper adjustment of Brightness Uniformity can create an exceptionally smooth screen in which: