
Installation Instructions

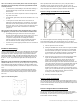
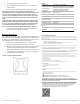
Table Of Contents
- TX+GB Wireless Glassbreak Installation Instructions
- PLEASE SEE REVERSE SIDE FOR IMPORTANT PRODUCT WARNINGS AND DISCLAIMER INFORMATION.
- Description
- Enrollment Into TX+ Encryption Supported Panels
- To enroll the TX+GB as an encrypted sensor into a panel that supports the TX+ Encryption protocol, follow these steps:
- Enrollment Into Non TX+ Encryption Supported Panels (ITI-319 Protocol)
- To enroll the TX+GB into a panel utilizing the standard ITI-319 protocol, follow these steps:
- Installation Guidelines
- Installation and Mounting
- Sensor Testing via Handheld Tester (5709C-W)
- Sensor Testing via Hand Clap
- Sensor Testing for Wireless Communication
- Replacing the Batteries

P/N 466-5425 • REV A • 20SEPT2018 © 2018 United Technologies Corporation. All rights reserved
Note: The TX+GB may not consistently detect cracks or breaks in glass.
Glassbreak sensors should always be backed up by additional methods
of interior protection.
• For best detection, avoid installing in rooms with lined, insulating, or
sound deadening drapes or rooms with closed wooden window
shutters inside.
• Do not use sensor near air compressors. A blast of compressed air
may cause a false alarm.
• Avoid stairwells, glass booths, and all rooms smaller than 10' x 10' (3
m x 3 m).
• TX+GB ignores most false alarm sounds. Some sounds can
duplicate the glass break pattern the TX+GB detects, so the device
works best in rooms with only moderate noise. Avoid rooms where
white noise, such as a fan, is present. Avoid rooms with noisy areas
or multiple noise sources such as small kitchens or bathrooms,
garages, etc.
Note: For glass break protection in these applications (where TX+GB is
not appropriate), use shock sensors on the windows or window frames.
• Avoid adding (learning) the sensor into 24-hour sensor groups,
where the sensor will be armed even when the room is in use. Like a
motion detector, a glass break sensor may be tripped when
occupants are in the protected area. Adding the TX+GB to a
perimeter sensor group, which is armed only when the perimeter
doors and windows are armed, will help prevent false alarms.
• The device may not work properly in humid rooms. Do not install it in
such conditions.
Installation and Mounting
Choose a mounting location. Since the sound of breaking glass travels straight
out from the broken window, the best location for mounting the sensor is the
wall opposite the window--assuming the glass to be protected is within the
sensor range and line of sight. The ceiling and adjoining (side) walls are also
good sensor locations. A ceiling mounted sensor will have better detection if
located 6' - 10' (2m - 3m) back from the glass rather than directly above the
glass.
IMPORTANT: DO NOT EXCEED THE 20' MAXIMUM DETECTION RANGE
OF THE TX+GB. While the sensor may function beyond the 20' range it could
miss a minimum output glassbreak. Furthermore, changing conditions in the
room, such as rearranging furniture, could reduce the range of the sensor back
to 20'.
Remove the cover from the sensor base. Hold the base against the wall or
ceiling at the desired mounting location. Insert screws through the mounting
holes and into the wall at the desired mounting location. Then re-attach the
front cover.
Figure 3: TX+GB mounting holes
Where possible, install sensors within 100 ft. (30 m) of the panel. While a
transmitter may have an open-air range of 500 ft. (150 m) or more, the
environment at the installation site may have a significant effect on operational
range. Changing a sensor location may improve wireless communication.
Sensor Testing via Handheld Tester (5709C-W)
Figure 4: Testing the TX+GB
The TX+GB is designed to detect the breaking of framed glass. Testing the
sensor with unframed glass, such as broken bottles etc. may not trip the
sensor. Use the hand-held tester and the following procedure to test the device:
1) Place the panel into Sensor Test Mode.
2) Holding the handheld tester near the surface of the glass and behind
any closed drapes or blinds, aim the tester at the TX+GB and hold
down the test button (see Figure 4). Remember, the device should
not be installed in rooms with lined, insulating, or sound deadening
drapes or rooms with closed wooden window shutters inside.
3) Observe the LED on the sensor. If the sensor is detecting the tester
signal, the LED will illuminate red. A one-second illumination
indicates the sensor has woken up and has detected the tester
signal. A two-second illumination indicates that the sensor has
detected the tester signal, and an alarm transmission has been sent.
These LED responses mean the sensor is mounted within range and
is working properly. If the LED does not illuminate when the test
button is pressed, the sensor is not detecting the tester signal.
Replace the tester battery if you suspect it is not producing a strong
signal. If you are certain that the tester signal is strong, reposition the
sensor closer to the window and retest. Add more sensors if
necessary to achieve complete coverage.
4) Exit Sensor Test Mode on the panel.
Sensor Testing via Hand Clap
You can also test the TX+GB by clapping your hands loudly under the sensor.
This sound will not trip the alarm, but the sensor LED will illuminate red for one
second. This indicates that the sensor has power and that the microphone and
circuit board are functioning.
Sensor Testing for Wireless Communication
The sensor test verifies proper communication between the sensor and the
panel/receiver. The sensor should be tested prior to permanent installation, as
well as weekly. To test the sensor, refer to the specific panel/receiver
documentation and do the following: