
User Manual


14
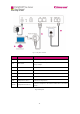
Setting up steps
Step 1: Connecting telephone line
Plug the line in a telephone and dial to test line function, then plug this line into server’s LINE port.
Once correctly connected, LINE LED on the front panel of the Server will be on (if FAX LED or
VOICE LED on, LINE LED off is normal), otherwise it will be off and the Server will beep every 3
seconds.
Step 2: Connecting network line
Plug one end of the RJ-45 Ethernet cable in LAN port and the other end in LAN wall jack or Ethernet
switch (including routers with connectors or function of switch) to connect the server to local network.
Once correctly connected, the LED LAN will be on or flash.
Step 3: Connecting a telephone or fax machine (optional)
If you don’t have to use extra telephone, fax machine or manual answer (see 8.2 Manual Answer), you
can skip this step. Plug one end of the RJ11 telephone cable in the PHONE port and the other end in a
telephone or fax machine (RJ11 of telephones or fax machines of different models and brands is
generally labelled as LINE or other). When there is an incoming call, the telephone or the fax machine
will ring and function normally in the event of that fax server is not in need.
Note: when a fax machine is connected to the Server and is set on auto answer mode, please
make sure that the fax machine’s auto answer rings more times than that of the Server,
otherwise the Server will fail to receive faxes.
Step 4: Connecting power adapter
Please use the provided power adapter. Connect the power cord with the adapter first and then plug the
power adapter in a two-line or three-line grounding receptacle and the circular connector in the PWR
port of the Server. With this done, the Server will initiate and the READY LED on the front panel will
be on.