Download a FREE electronic copy of the Owner’s Manual or Warranty Booklet by visiting the For Owners tab at: www.chrysler.com (U.S.) or www.chrysler.ca (Canada). 2012 USER GUIDE THE CHRYSLER � �� 12C41-926-A A • 200 • FI R S T ED ITI O N • u ser g u ide 918057_12a_200_User_Guide_051111.
If you are the first registered retail owner of your vehicle, you may obtain a complimentary printed copy of the Owner’s Manual, Navigation/Media Center Manuals or Warranty Booklet by calling 1-800-247-9753 (U.S.) or 1-800-387-1143 (Canada) or by contacting your dealer. The driver’s primary responsibility is the safe operation of the vehicle. Driving while distracted can result in loss of vehicle control, resulting in a collision and personal injury.
TABLE OF CONTENTS INTRODUCTION/WELCOME Welcome From Chrysler Group LLC . . . . . . 2 CONTROLS AT A GLANCE Driver Cockpit . . . . . . . . . . . . . . . . 4 Instrument Cluster . . . . . . . . . . . . . . 6 GETTING STARTED Key Fob . . . . . . . . . . . . . . . Remote Start . . . . . . . . . . . . . Theft Alarm . . . . . . . . . . . . . Seat Belt . . . . . . . . . . . . . . . Supplemental Restraint System (SRS) — Air Bags . . . . . . . . . . . . . . . Child Restraints . . . . . . . . . . . . Front Seats . . .
INTRODUCTION/WELCOME WELCOME FROM CHRYSLER GROUP LLC Congratulations on selecting your new Chrysler Group LLC vehicle. Be assured that it represents precision workmanship, distinctive styling, and high quality - all essentials that are traditional to our vehicles. Your new Chrysler Group LLC vehicle has characteristics to enhance the driver's control under some driving conditions. These are to assist the driver and are never a substitute for attentive driving. They can never take the driver's place.
INTRODUCTION/WELCOME Vehicles Sold In Canada With respect to any vehicles sold in Canada, the name Chrysler Group LLC shall be deemed to be deleted and the name Chrysler Canada Inc. used in substitution therefore. WARNING! • Pedals that cannot move freely can cause loss of vehicle control and increase the risk of serious personal injury. • Always make sure that objects cannot fall into the driver foot well while the vehicle is moving.
DRIVER COCKPIT CONTROLS AT A GLANCE 04
E. Audio System (touch-screen-radio shown) pg. 24 D. Wiper/Washer Lever (behind steering wheel) pg. 18 J. Power Outlet/Cigar Lighter pg. 61 I. Park Brake Lever H. Transmission Gear Selector C. Instrument Cluster pg. 6 − Hazard Switch − Electronic Stability Control pg. 64 − Heated Seat Switches pg. 15 F. SWITCH PANEL G. Climate Controls pg. 20 B. Electronic Vehicle Information Center (EVIC) Display (behind steering wheel) pg. 56 A. Turn Signal/Lights Lever (behind steering wheel) pg. 17 Q.
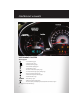
CONTROLS AT A GLANCE INSTRUMENT CLUSTER Warning Lights - Low Fuel Warning Light - Charging System Light** - Oil Pressure Warning Light** - Anti-Lock Brake (ABS) Light** - Air Bag Warning Light** - Electronic Throttle Control (ETC) Light - Tire Pressure Monitoring System (TPMS) Light - Engine Temperature Warning Light - Transmission Temperature Warning Light - Seat Belt Reminder Light BRAKE - Brake Warning Light** - Malfunction Indicator Light (MIL)** - Electronic Stability Control (ESC) Activation/Malfun
CONTROLS AT A GLANCE Indicators - Turn Signal Indicators - High Beam Indicator - Front Fog Light Indicator - Vehicle Security Indicator* - Cruise Indicator - Electronic Stability Control (ESC) Off Indicator - Park/Headlight ON Indicator Odometer Messages door - Door Ajar dECK - Trunk Ajar HOTOIL* - Engine Oil is over temperature CHANgE OIL* - Change Engine Oil gASCAP - Fuel Cap Fault LoW tirE - Low Tire Pressure * If equipped ** Bulb Check with Key On 07
GETTING STARTED KEY FOB Locking And Unlocking The Doors • Press the LOCK button once to lock all the doors. Press the UNLOCK button once to unlock the driver’s door only and twice within five seconds to unlock all the doors. • All doors can be programmed to unlock on the first press of the UNLOCK button. Refer to Programmable Features in this guide. Opening The Trunk • Press the TRUNK button on the transmitter two times within five seconds to open the trunk.
GETTING STARTED WARNING! • Do not start or run an engine in a closed garage or confined area. Exhaust gas contains Carbon Monoxide (CO) which is odorless and colorless. Carbon Monoxide is poisonous and can cause you or others to be severely injured or killed when inhaled. • Keep Key Fob transmitters away from children. Operation of the Remote Start System, windows, door locks or other controls could cause you and others to be severely injured or killed.
GETTING STARTED WARNING! In a collision, you and your passengers can suffer much greater injuries if you are not buckled up properly. You can strike the interior of your vehicle or other passengers, or you can be thrown out of the vehicle. Always be sure you and others in your vehicle are buckled up properly. SUPPLEMENTAL RESTRAINT SYSTEM (SRS) — AIR BAGS • This vehicle has Advanced Front Air Bags for both the driver and right front passenger as a supplement to the seat belt restraint system.
GETTING STARTED CHILD RESTRAINTS • Children 12 years and under should ride properly buckled up in a rear seat, if available. According to crash statistics, children are safer when properly restrained in the rear seats rather than in the front. • Every state in the United States and all Canadian provinces require that small children ride in proper restraint systems. This is the law, and you can be prosecuted for ignoring it.
GETTING STARTED • Tighten all three straps as you push the child restraint rearward and downward into the seat. Installing The Child Restraint Using The Vehicle Seat Belts • To install a child restraint, first, pull enough of the seat belt webbing from the retractor to route it through the belt path of the child restraint and slide the latch plate into the buckle. • Next, extract all the seat belt webbing out of the retractor and then allow the belt to retract into the retractor.
GETTING STARTED FRONT SEATS Power Seat • The power seat switch, located on the outboard side of the seat near the floor, controls forward/back, up/down, and tilt adjustment. • The recline switch controls the seatback recliner. Manual Seat Adjustment Forward/Rearward • Lift up on the adjusting bar located at the front of the seat near the floor and release at the desired position. Recliner • Lift the recliner lever located on the outboard side of the seat, lean back and release at the desired position.
GETTING STARTED Driver’s Seat Height Adjustment • The height adjustment control lever is located on the outboard side of the seat. Raise the lever to raise the seat. Lower the lever to lower the seat. CAUTION! DO NOT place any article under a power seat or impede its ability to move as it may cause damage to the seat controls. Seat travel may become limited if movement is stopped by an obstruction in the seat’s path. WARNING! • Adjusting a seat while the vehicle is moving is dangerous.
GETTING STARTED HEATED SEATS Front Heated Seats • The controls for the front heated seats are located in the center console below the climate controls. • Press the switch once to select High-level heating. Press the switch a second time to select Low-level heating. Press the switch a third time to shut the heating elements Off. • If the High-level setting is selected, the system will automatically switch to Low-level after approximately 60 minutes.
GETTING STARTED TILT / TELESCOPING STEERING COLUMN • The tilt/telescoping control lever is located below the steering wheel at the end of the steering column. • Push down on the lever to unlock the steering column. • To tilt the steering column, move the steering wheel upward or downward as desired. To lengthen or shorten the steering column, pull the steering wheel outward or push it inward as desired. • Pull upward on the lever to lock the column firmly in place.
OPERATING YOUR VEHICLE ENGINE BREAK-IN RECOMMENDATIONS • A long break-in period is not required for the engine and drivetrain (transmission and axle) in your vehicle. • Drive moderately during the first 300 miles (500 km). After the initial 60 miles (100 km), speeds up to 50 or 55 mph (80 or 90 km/h) are desirable. • While cruising, brief full-throttle acceleration within the limits of local traffic laws contributes to a good break-in.
OPERATING YOUR VEHICLE • Rotate the center portion of the lever up to increase the brightness of the instrument panel lights when the parking lights or headlights are on. • Rotate the center portion of the lever upward to the next detent position to brighten the odometer and radio controls when the parking lights or headlights are on. • Rotate the center portion of the lever upward to the last detent to turn on the interior lighting. Flash To Pass • Pull the lever toward you to activate the high beams.
OPERATING YOUR VEHICLE Mist • Pull down on the lever and release when a single wipe is desired. NOTE: The mist feature does not activate the washer pump; therefore, no washer fluid will be sprayed on the windshield. The wash function must be used in order to spray the windshield with washer fluid. Washer Operation • Pull the lever toward you and hold for as long as spray is desired. SPEED CONTROL • The speed control switches are located on the steering wheel.
OPERATING YOUR VEHICLE WARNING! • Leaving the Electronic Speed Control system on when not in use is dangerous. You could accidentally set the system or cause it to go faster than you want. You could lose control and have a collision. Always leave the Electronic Speed Control system off when you are not using it. • Electronic Speed Control can be dangerous where the system cannot maintain a constant speed. Your vehicle could go too fast for the conditions, and you could lose control.
OPERATING YOUR VEHICLE AUTOMATIC TEMPERATURE CONTROLS (ATC) Automatic Operation • Turn the Mode and Blower Controls to the AUTO position. • Select the desired temperature by rotating the Temperature Control. • The system will maintain the set temperature automatically. Air Conditioning • If the air conditioning button is pressed while in the AUTO mode, the indicator light may flash three times to indicate the cabin air is being controlled automatically.
OPERATING YOUR VEHICLE POWER SUNROOF Manual Open/Close • Press and hold the switch rearward to open or forward to close the sunroof. Any release of the switch will stop the movement, and the sunroof will remain in a partially open or closed position until the switch is pressed again. Pinch Protection Feature • This feature will detect an obstruction in the opening of the sunroof or the shade during Express Close operation.
OPERATING YOUR VEHICLE WARNING! • Never leave children in a vehicle with the key in the ignition switch. Occupants, particularly unattended children, can become entrapped by the power sunroof while operating the power sunroof switch. Such entrapment may result in serious injury or death. • In a collision, there is a greater risk of being thrown from a vehicle with an open sunroof. You could also be severely injured or killed.
ELECTRONICS YOUR VEHICLE'S SOUND SYSTEM 24
ELECTRONICS 25
ELECTRONICS Media Center 130 (Sales Code RES) NOTE: • Your radio has many features that add to the comfort and convenience of you and your passengers. Some of these radio features should not be used when driving because they take your eyes from the road or your attention from driving. Clock Setting • Press and hold the “TIME” button until the hours blink; turn the “TUNE/SCROLL” control knob to set the hours.
ELECTRONICS Store Radio Presets • Press the “SET/RND” button once and SET 1 will show in the display. Then select button (1–6). • A second station may be added to each push button. Press the “SET/RND” button twice and SET 2 will show in the display. Then select button (1–6). CD/DISC Operation Seek Up/Down Buttons • Press to seek through CD tracks. • Hold either button to bypass tracks without stopping. SET/RND Button (Random Play) • Press this button while the CD is playing to activate Random Play.
ELECTRONICS Media Center 130 with Satellite Radio (Sales Code RES + RSC) NOTE: • Your radio may not be equipped with the Uconnect™ Voice Command and Uconnect™ Phone features. To determine if your radio has these features, press the Voice Command button on the radio. You will hear a voice prompt if you have the feature, or see a message on the radio stating “Uconnect Phone not available” if you do not. • Your radio has many features that add to the comfort and convenience of you and your passengers.
ELECTRONICS Radio Operation Seek Up/Down Buttons • Press to seek through radio stations in AM, FM, or SAT bands. • Hold either button to bypass stations without stopping. Store Radio Presets • Press the “SET/RND” button once and SET 1 will show in the display. Then select button (1–6). • A second station may be added to each push button. Press the “SET/RND” button twice and SET 2 will show in the display. Then select button (1–6). Music Type • Press the “MUSIC TYPE” button to activate this mode.
ELECTRONICS LIST Button • Press the “LIST” button to bring up a list of all folders on the CD. Scroll up or down the list by turning the “TUNE/SCROLL” control knob. • To select a folder from the list, press the “TUNE/SCROLL” control knob and the radio will begin playing the files contained in that folder. Audio Jack Operation • The Audio Jack allows a portable device, such as an MP3 player or a cassette player, to be plugged into the radio and utilize the vehicle’s audio system, using a 3.
ELECTRONICS • Your radio has many features that add to the comfort and convenience of you and your passengers. Some of these radio features should not be used when driving because they take your eyes from the road or your attention from driving. Clock Setting • Turn the radio on, then touch the screen where the time is displayed. • Touch the “USER CLOCK” soft-key (Navigation radio only). • To adjust the hours, touch either the “HOUR FORWARD” or “HOUR BACKWARD” soft-key.
ELECTRONICS • Select the “Auto Color Mode” soft-key to switch to automatic daytime/nighttime mode and to control the brightness of the display using the dimmer switch of the vehicle. • Touch the “EXIT” soft-key to save your settings. Radio Operation • To access Radio Mode, touch the “RADIO” hard-key on the right side of the faceplate, then touch the “AM,” “FM” or “SAT” soft-key at the top of the screen to select the band.
ELECTRONICS CD/DVD Disc Operation • Press the “MEDIA” hard key to display the media source tabs at the top of the screen. Select the source by touching the “HDD,” “DISC,” or “AUX” media source soft-key tab. NOTE: Your Touch-Screen Radio will usually automatically switch to the appropriate mode when something is first connected or inserted into the system. Insert a CD/DVD Disc • To insert a disc, press the or “LOAD” hard-key. • With the printed side upwards, insert the disc into the disc slot of the radio.
ELECTRONICS • The functions of the portable device are controlled using the device buttons. The volume may be controlled using the radio or portable device. Hard Disk Drive (HDD) Operation • The Hard Disk Drive (HDD) mode gives you access to the audio files on the internal hard disk drive. It functions similar to a CD player, with the exception that the internal HDD can hold more tracks. • It is also possible to import display pictures to the internal hard disk drive.
ELECTRONICS • Select the folders or titles you would like to copy, then touch the “DONE” soft-key to start the copy process. NOTE: The copy progress is shown in the lower left corner of the screen. Copying Pictures To The HDD • Insert either a CD or a USB device containing your pictures in JPEG format. • Press the “MY FILES” hard-key. • Touch the “My Pictures” soft-key to get an overview of the currently stored images, then touch the “Add” soft-key.
ELECTRONICS Playing Music From The HDD • Press the “MEDIA” hard key to display the media source tabs at the top of the screen. Touch the “HDD” soft-key tab. Touch the desired track soft-key to play or touch the “SEARCH/BROWSE” soft-key to search by artist, by album, by song, by genre, from a folder, or from Favorites. Cleaning Your Touch-Screen Radio • Do not spray any liquid or caustic chemicals directly on the screen.
ELECTRONICS Main Navigation Menu Finding Points Of Interest • From the main Navigation menu, touch “Where To?,” then touch “Points of Interest.” • Select a Category and then a subcategory, if necessary. • Select your destination and touch “Go.” Finding A Place By Spelling The Name • From the Main Navigation Menu, touch “Where to?,” then touch “Points of Interest” and then touch “Spell Name.” • Enter the name of your destination. • Touch “Done.” • Select your destination and touch “Go.
ELECTRONICS Following Your Route • Your route is marked with a magenta line on the map. If you depart from the original route, your route is recalculated. A speed limit icon could appear as you travel on major roadways. Adding A Via Point • To add a stop (Via Point) you must be navigating a route. • Touch the “back arrow icon” to return to the Main Navigation menu. • Touch “Where To?,” then search for the extra stop. Then select the stop to add from the search results.
ELECTRONICS Edit Home Location • From the main Navigation menu, touch “Where To?,” then touch “Favorites.” • Next, touch the location you would like to edit, then touch “Press for More,” and then “Edit.” Go Home • A Home location must be saved in the system. From the Main Navigation menu, touch “Where To?,” then touch “Go Home.” Acquiring Satellites • The GPS Satellite strength bars indicate the strength of your satellite reception. • Acquiring satellite signals can take a few minutes.
ELECTRONICS Clock Setting • Turn the radio on, then touch the screen where the time is displayed. • Touch the “USER CLOCK” soft-key. • To adjust the hours, touch either the “HOUR FORWARD” or “HOUR BACKWARD” soft-key. • To adjust the minutes, touch either the “MINUTE FORWARD” or “MINUTE BACKWARD” soft-key. • To save the new time setting, touch the screen where the word “Save” is displayed. Menu • Press the “MENU” hard-key to access the System Setup menu and the My Files menu.
ELECTRONICS Radio Operation • To access Radio Mode, touch the “RADIO/MEDIA” hard-key on the right side of the faceplate repeatedly until AM/FM/SAT appears at the top of the screen, then touch the “AM,” “FM” or “SAT” soft-key to select the band. Seek Up/Seek Down • Press the “Seek Up” or “Seek Down” hard-keys to seek through radio stations in AM, FM, or SAT bands. Hold either Seek to bypass stations without stopping.
ELECTRONICS CD/DVD Disc Operation • Press the “RADIO/MEDIA” hard key until the media source tabs are displayed at the top of the screen. Select the source by touching the “HDD,” “DISC,” or “AUX” media source soft-key tab. NOTE: Your Touch-Screen Radio will usually automatically switch to the appropriate mode when something is first connected or inserted into the system.
ELECTRONICS • The functions of the portable device are controlled using the device buttons. The volume may be controlled using the radio or portable device. Hard Disk Drive (HDD) Operation • The Hard Disk Drive (HDD) mode gives you access to the audio files on the internal hard disk drive. It functions similar to a CD player, with the exception that the internal HDD can hold more tracks. • It is also possible to import display pictures to the internal hard disk drive.
ELECTRONICS Copying Music From USB • The USB port on the radio face plate allows you to copy files to your hard drive. To access, lift up on the cover. • Insert a USB device (e.g. thumb drive or memory stick), then select “MY FILES”. • Touch the “MY MUSIC” soft-key, then touch the “Add Music Files” to HDD soft-key. • Touch “From USB” soft-key, then select the folders or titles you would like to copy, and then touch the “SAVE” soft-key to start the copy process.
ELECTRONICS Display a Picture on the Radio Screen • Once the import is complete, the pictures will then be available in the “MY PICTURES” screen. • Press the “MENU” hard-key to access the Settings Menu, then touch the “My Files” soft-key and then touch the “My Pictures” soft-key. Touch the desired picture, then touch the “Set as Picture View” soft-key and then touch the “Exit” soft-key.
ELECTRONICS NOTE: For your own safety and the safety of others, it is not possible to use the certain features while the vehicle is in motion. Main Navigation Menu Finding Points Of Interest • From the NAV main menu, touch the “Points of Interest” soft-key. • Select a Category and then a subcategory, if necessary. • Select your destination and touch “GO.” Finding A Place By Entering The Street Address • From the NAV main menu, touch “New Destination,” then touch “Street Address.
ELECTRONICS • Touch the “LIST” soft-key to display a list of possible street names. Select the correct street name. • Next input the number • In the Confirm Route screen the navigation radio displays the complete address, a map of the destination area, and the current routing method for you to verify. • Touch the “GO” soft-key to activate the route guidance. Where Am I Now? • From the NAV main menu, touch “Where Am I Now?.
ELECTRONICS • “Take Detour” will allow you to calculate a different route. • Touch “Find Nearby POI” to search for a local POI. • “Destination Info” displays destination information. • “View Turn List” lists streets utilized for the current route. • Touch the “Save Destination” to save the destination address. • “Change Method” will allow you to change the routing method. Entering Your Home Location • Press the “NAV” hard-key on the right side of the radio.
ELECTRONICS SIRIUS TRAVEL LINK (Media Center 730N (RHR) & Media Center 430N (RHB) Only) • SIRIUS Travel Link brings a wealth of useful information into your vehicle and right to your fingertips. • To access Travel Link, press the MENU hard-key, then the Travel Link soft-key NOTE: SIRIUS Travel Link requires a subscription, sold separately after the 1 year trial subscription included with your vehicle purchase.
ELECTRONICS STEERING WHEEL AUDIO CONTROLS • The steering wheel audio controls are located on the rear surface of the steering wheel. Right Switch • Press the switch up or down to increase or decrease the volume. • Press the button in the center to change modes AM/FM/CD/SAT. Left Switch • Press the switch up or down to search for the next listenable station or select the next or previous CD track.
ELECTRONICS • When connected to this feature: • The iPod® can be controlled using the radio buttons to Play, Browse, and List the iPod® or external devices contents. • The iPod® battery charges when plugged into the USB port (if supported by the specific audio device). • Compatible iPod® devices may also be controllable using voice commands. Refer to the Owner's Manual on the DVD for details. NOTE: • The USB port supports certain Mini, Classic, Nano, Touch, and iPhone® devices.
ELECTRONICS Phone Pairing NOTE: Pairing is a one-time initial setup before using the phone. • Press the “Phone” button to begin. • Wait for the “ready” prompt and BEEP. • (After the BEEP), say ”setup” or “Uconnect device setup”. • (After the BEEP), say “device pairing”. • (After the BEEP), say “pair a device”. • Follow the audible prompts. • You will be asked to say a four-digit Personal Identification Number (PIN), which you will later need to enter into your mobile phone.
ELECTRONICS • Only the phonebook of the currently connected mobile phone is accessible. • Only the mobile phone’s phonebook is downloaded. SIM card phonebook is not part of the Mobile phonebook. • This downloaded phonebook cannot be edited or deleted on the Uconnect™ Phone. These can only be edited on the mobile phone. The changes are transferred and updated to Uconnect™ Phone on the next phone connection. Phonebook Edit • Press the “Phone” button . • (After the BEEP), say “phonebook”.
ELECTRONICS WARNING! (Continued) • In an emergency, to use Uconnect™ Phone, your mobile phone must be: • turned on, • paired to Uconnect™ Phone, • and have network coverage. Uconnect™ VOICE COMMAND • The Uconnect™ Voice Command system allows you to control your AM, FM radio, satellite radio, disc player, HDD, Uconnect™ Phone, a memo recorder, and supported portable media devices. located on the radio faceplate or • When you press the “Voice Command” button steering wheel, you will hear a beep.
ELECTRONICS Disc Mode Memo Mode “Track” (#) (to change the track) “Next Track” (to play the next track) “Previous Track” (to play the previous track) “Main Menu” (to switch to the main menu) To switch to the voice recorder mode, say “Memo”. The following are common voice commands for this mode: “New Memo” (to record a new memo) — During the recording, you may press the Voice Command button to stop recording.
ELECTRONICS Bluetooth® STREAMING AUDIO • If equipped with Uconnect™ Voice Command, your Bluetooth-equipped iPod® devices, cell phones or other media players, may also be able to stream music to your vehicle's speakers. Your connected device must be Bluetooth-compatible, and paired with your Media Center radio (see Uconnect™ Phone for pairing instructions). Non-Touch-Screen Radios: Press the “AUX” button on the radio faceplate until "BT" or “Audio Streaming” is displayed on the radio screen.
ELECTRONICS PROGRAMMABLE FEATURES Electronic Vehicle Information Center (EVIC) – If Equipped • The EVIC can be used to program the following Personal Settings. Press and release the to MENU button until Personal Settings displays, then press the DOWN button to change the setting. scroll through the settings.
ELECTRONICS Flashing Lights With Lock • The turn signal lights flashing, when the doors are locked or unlocked, feature can be turned on or off. To turn this feature on or off: • Press and hold the UNLOCK button for at least 4 seconds, but no longer than 10 seconds. Then, press and hold the LOCK button while still holding the UNLOCK button. • Release both buttons at the same time.
ELECTRONICS Programming A Rolling Code • For programming Garage Door Openers that were manufactured after 1995. These Garage Door Openers can be identified by the “LEARN” or “TRAIN” button located where the hanging antenna is attached to the Garage Door Opener. It is NOT the button that is normally used to open and close the door. The name and color of the button may vary by manufacturer. • Place the ignition switch into the ON/RUN position.
ELECTRONICS NOTE: • If the indicator light stays on constantly, programming is complete and the garage door (or device) should activate when the HomeLink® button is pressed. • To program the two remaining HomeLink® buttons, repeat each step for each remaining button. DO NOT erase the channels. Using HomeLink® • To operate, press and release the programmed HomeLink® button. Activation will now occur for the programmed device (i.e.
ELECTRONICS POWER OUTLETS • There are two 12 Volt electrical outlets on this vehicle. • The instrument panel power outlet, located below the climate control knobs, has power available only when the ignition is ON. This power outlet will also operate a conventional cigar lighter unit. • There is also a power outlet located on the inside of the center console. This power outlet is powered directly from the battery (power available at all times).
62 Maximum Trailer Weight Ratings Max. GTW (Gross Trailer Wt.) 1,000 lbs (450 kg) 2,000 lbs (900 kg) Max. Trailer Tongue Wt.1 100 lbs (45 kg) 200 lbs (90 kg) Towing a trailer with a larger than recommended frontal area could cause the engine to overheat or cause severe engine damage under extreme conditions. CAUTION! Enclosed trailers or open utility trailers with front shields/guards are not recommended for use with four-cylinder engines with an automatic transmission.
UTILITY RECREATIONAL TOWING (BEHIND MOTORHOME, ETC.) Towing This Vehicle Behind Another Vehicle Towing Condition Flat Tow Dolly Tow On Trailer Wheels OFF the Ground NONE Front Rear ALL Recreational Towing – All Models • Recreational towing is allowed ONLY if the front wheels are OFF the ground. This may be accomplished using a tow dolly or vehicle trailer. If using a tow dolly, follow this procedure: • Properly secure the dolly to the tow vehicle, following the dolly manufacturer's instructions.
WHAT TO DO IN EMERGENCIES 24-HOUR TOWING ASSISTANCE • Dial toll-free 1-800-521-2779 or 1-800-363-4869 for Canadian residents. • Provide your name, vehicle identification number and license plate number. • Provide your location, including telephone number, from which you are calling. • Briefly describe the nature of the problem and answer a few simple questions. • You will be given the name of the service provider and an estimated time of arrival.
WHAT TO DO IN EMERGENCIES • IF THE LIGHT STARTS FLASHING INDICATING A LOW TIRE PRESSURE, ADJUST THE AIR PRESSURE IN THE LOW TIRE TO THE AIR PRESSURE SHOWN ON THE VEHICLE PLACARD OR TIRE INFLATION PRESSURE LABEL LOCATED ON THE DRIVER'S DOOR. NOTE: AFTER INFLATION, THE VEHICLE MAY NEED TO BE DRIVEN FOR 20 MINUTES BEFORE THE FLASHING LIGHT WILL TURN OFF.
WHAT TO DO IN EMERGENCIES WARNING! A hot engine cooling system is dangerous. You or others could be badly burned by steam or boiling coolant. You may want to call an authorized service center for service if your vehicle overheats. BRAKE - Brake Warning Light • The Brake Warning light illuminates when there is either a system malfunction or the parking brake is applied.
WHAT TO DO IN EMERGENCIES - Anti-Lock Brake (ABS) Light • This light monitors the Anti-Lock Brake System (ABS). • If the light is not on during starting, stays on, or turns on while driving, we recommend you drive to the nearest service center and have the vehicle serviced immediately. - Electronic Throttle Control (ETC) Light • This light informs you of a problem with the Electronic Throttle Control (ETC) system. • If a problem is detected, the light will come on while the engine is running.
WHAT TO DO IN EMERGENCIES IF YOUR ENGINE OVERHEATS • In any of the following situations, you can reduce the potential for overheating by taking the appropriate action. • On the highways — slow down. • In city traffic — while stopped, shift transmission into NEUTRAL, but do not increase engine idle speed. NOTE: There are steps that you can take to slow down an impending overheat condition: • If your air conditioner (A/C) is on, turn it off.
WHAT TO DO IN EMERGENCIES JACKING AND TIRE CHANGING Jack Location • The jack and jack-handle are stowed under the load floor in the trunk. Spare Tire Stowage • The compact spare tire is stowed under the rear load floor in the trunk. Spare Tire Removal • Lift up the load floor cover and remove the hold down. Spare Tire and Jack Stowage Preparations For Jacking 1. Park the vehicle on a firm, level surface. Avoid ice or slippery areas. 2. Turn on the Hazard Warning flashers. 3. Set the parking brake. 4.
WHAT TO DO IN EMERGENCIES Jacking Instructions 1. Remove the scissors jack and lug wrench from the spare wheel as an assembly. Turn the jack screw to the left to loosen the lug wrench, and remove the wrench from the jack assembly. NOTE: The jack handle attaches to the side of the jack with two attachment points. When the jack is partially expanded, the tension between the two attachment points holds the jack handle in place. 2.
WHAT TO DO IN EMERGENCIES 7. Lower the vehicle by turning the jack screw to the left. 8. Finish tightening the nuts. Push down on the wrench while at the end of the handle for increased leverage. Tighten the lug nuts in a star pattern until each nut has been tightened twice. The correct wheel nut torque is 100 ft lbs (135 N·m). If you doubt that you have tightened the nuts correctly, have them checked with a torque wrench by your authorized dealer or at a service station. 9.
WHAT TO DO IN EMERGENCIES 6. Finish tightening the lug nuts. Push down on the wrench while at the end of the handle for increased leverage. Tighten the lug nuts in a star pattern until each nut has been tightened twice. The correct tightness of each lug nut is 100 ft/lbs (135 N·m). If in doubt about the correct tightness, have them checked with a torque wrench by your authorized dealer or service station. 7.
WHAT TO DO IN EMERGENCIES WARNING! (Continued) • Do not attempt to change a tire on the side of the vehicle close to moving traffic, pull far enough off the road to avoid the danger of being hit when operating the jack or changing the wheel. • Always park on a firm, level surface as far from the edge of the roadway as possible before raising the vehicle. • Turn on the Hazard Warning flashers. • Block the wheel diagonally opposite the wheel to be raised.
WHAT TO DO IN EMERGENCIES BATTERY LOCATION • The battery in your vehicle is located between the left front headlight assembly and the left front wheel splash shield. To allow jump-starting there are remote battery posts located on the left side of the engine compartment. JUMP-STARTING • If your vehicle has a discharged battery it can be jump-started using a set of jumper cables and a battery in another vehicle or by using a portable battery booster pack.
WHAT TO DO IN EMERGENCIES Jump-Starting Procedure 1. Connect the positive (+) end of the jumper cable to the remote positive (+) post of the discharged vehicle. 2. Connect the opposite end of the positive (+) jumper cable to the positive (+) post of the booster battery. 3. Connect the negative end (-) of the jumper cable to the negative (-) post of the booster battery. 4. Connect the opposite end of the negative (-) jumper cable to the remote negative (-) post of the vehicle with the discharged battery.
WHAT TO DO IN EMERGENCIES WARNING! (Continued) • Take care to avoid the radiator cooling fan whenever the hood is raised. It can start anytime the ignition switch is on. You can be injured by moving fan blades. • Remove any metal jewelry such as watch bands or bracelets that might make an inadvertent electrical contact. You could be seriously injured. • Batteries contain sulfuric acid that can burn your skin or eyes and generate hydrogen gas which is flammable and explosive.
Shift lever must be in Recommended Method *NEUTRAL. The distance to be traveled must not exceed 15 mi (25 km), and the towing speed must not exceed 25 mph (40 km/h).
WHAT TO DO IN EMERGENCIES FREEING A STUCK VEHICLE • If your vehicle becomes stuck in mud, sand or snow, it can often be moved by a rocking motion. Turn your steering wheel right and left to clear the area around the front wheels. Then move the shift lever back and forth between REVERSE and DRIVE. Using minimal accelerator pedal pressure to maintain the rocking motion, without spinning the wheels, is most effective.
WHAT TO DO IN EMERGENCIES EVENT DATA RECORDER (EDR) • This vehicle is equipped with an event data recorder (EDR). The main purpose of an EDR is to record, in certain crash or near crash-like situations, such as an air bag deployment or hitting a road obstacle, data that will assist in understanding how a vehicle’s systems performed. The EDR is designed to record data related to vehicle dynamics and safety systems for a short period of time, typically 30 seconds or less.
MAINTAINING YOUR VEHICLE OPENING THE HOOD • Pull the release lever located below the instrument panel and in front of the driver’s door. • Raise the hood and locate the safety latch, in the middle of the hood opening. • Move the safety latch while lifting the hood at the same time. • Insert the support rod into the slot on the hood. • To close the hood, remove the support rod and place it in the retaining clip, then lower the hood slowly.
2.
3.
MAINTAINING YOUR VEHICLE FLUIDS AND CAPACITIES Component Engine Coolant 2.4L Fluid, Lubricant, or Genuine Part MOPAR® Antifreeze/Coolant Five Year/100,000 Mile Formula HOAT (Hybrid Organic Additive Technology) or equivalent. Engine Coolant 3.6L MOPAR® Antifreeze/Coolant Five Year/100,000 Mile Formula HOAT (Hybrid Organic Additive Technology) or equivalent. Engine Oil with Filter 2.4L API Certified SAE 5W-20 engine oil, meeting the requirements of Chrysler Material Standard MS-6395.
84 • Refer to the Owner's Manual on the DVD for the complete maintenance schedule. Miles: 8,000 16,000 24,000 32,000 40,000 48,000 56,000 64,000 72,000 80,000 88,000 96,000 104,000 Or Months: 6 12 18 24 30 36 42 48 54 60 66 72 78 Or Kilometers: 13,000 26,000 39,000 52,000 65,000 78,000 91,000 104,000 117,000 130,000 143,000 156,000 169,000 Change the engine oil and filter.
MAINTAINING YOUR VEHICLE Maintenance Record Odometer Date Signature, Authorized Service Center 8,000 Miles (13,000 km) or 6 Months 16,000 Miles (26,000 km) or 12 Months 24,000 Miles (39,000 km) or 18 Months 32,000 Miles (52,000 km) or 24 Months 40,000 Miles (65,000 km) or 30 Months 48,000 Miles (78,000 km) or 36 Months 56,000 Miles (91,000 km) or 42 Months 64,000 Miles (104,000 km) or 48 Months 72,000 Miles (117,000 km) or 54 Months 80,000 Miles (130,000 km) or 60 Months 88,000 Miles (143,000 km) or 66 M
MAINTAINING YOUR VEHICLE FUSES Integrated Power Module • The Integrated Power Module (fuses) is located in the engine compartment near the air cleaner assembly. This center contains cartridge fuses and mini fuses. A label that identifies each component may be printed on the inside of the cover.
MAINTAINING YOUR VEHICLE Cavity Cartridge Fuse Mini Fuse 17 — 10 Amp Red 18 19 20 21 40 Amp Green — — — — 20 Amp Yellow 15 Amp Lt. Blue 10 Amp Red 22 — 10 Amp Red 23 24 — — 15 Amp Lt. Blue 25 Amp Natural 25 — 10 Amp Red 26 — 15 Amp Lt.
MAINTAINING YOUR VEHICLE CAUTION! (Continued) • When replacing a blown fuse, it is important to use only a fuse having the correct amperage rating. The use of a fuse with a rating other than indicated may result in a dangerous electrical system overload. If a properly rated fuse continues to blow, it indicates a problem in the circuit that must be corrected.
MAINTAINING YOUR VEHICLE WHEEL AND WHEEL TRIM CARE • All wheels and wheel trim, especially aluminum and chrome plated wheels, should be cleaned regularly with a mild soap and water to prevent corrosion. • To remove heavy soil and/or excessive brake dust, use MOPAR® Wheel Cleaner or equivalent or select a non-abrasive, non-acidic cleaner. CAUTION! Do not use scouring pads, steel wool, a bristle brush, or metal polishes. Do not use oven cleaner. These products may damage the wheel's protective finish.
CONSUMER ASSISTANCE CHRYSLER GROUP LLC CUSTOMER CENTER P.O. Box 21–8004 Auburn Hills, MI 48321–8004 Phone: 1–800–247–9753 CHRYSLER CANADA INC. CUSTOMER CENTER P.O. Box 1621 Windsor, Ontario N9A 4H6 Phone: 1–800–465–2001 (English) Phone: 1–800–387–9983 (French) ASSISTANCE FOR THE HEARING IMPAIRED • To assist customers who have hearing difficulties, the manufacturer has installed special TDD (Telecommunication Devices for the Deaf) equipment at its customer center.
CONSUMER ASSISTANCE NOTE: • The Owner's Manual and User Guide electronic files are also available on the Chrysler, Jeep, Ram Truck and Dodge websites. • Click on the "For Owners" tab, select "Owner/Service Manuals", then select your desired model year and vehicle from the drop down lists. REPORTING SAFETY DEFECTS IN THE 50 UNITED STATES AND WASHINGTON, D.C.
MOPAR ACCESSORIES AUTHENTIC ACCESSORIES BY MOPAR® • The following highlights just some of the many Authentic Chrysler Accessories by Mopar featuring a fit, finish, and functionality specifically for your Chrysler 200. • In choosing Authentic Accessories you gain far more than expressive style, premium protection, or extreme entertainment, you also benefit from enhancing your vehicle with accessories that have been thoroughly tested and factory-approved.
INDEX Air Conditioning . . . . . . . . . . . . . . 21 Airbag . . . . . . . . . . . . . . . . . . . 10 Alarm, Panic . . . . . . . . . . . . . . . . 8 Arming Theft System (Security Alarm) . . . 9 Audio Settings . . . . . . . 26,27,28,30,33,42 Automatic Headlights . . . . . . . . . . . 17 Automatic Temperature Control (ATC) . . 21 Air Recirculation . . . . . . . . . . . . . 21 Automatic Operation . . . . . . . . . . 21 Rear Temperature Control . . . . . . . 20 Automatic Transmission Fluid Type . . . . . . . .
INDEX Intermittent Wipers (Delay Wipers) . . . . 18 Introduction . . . . . . . . . . . . . . . . . 2 iPod®/USB/MP3 Control . . . . . . . . . 50 Bluetooth Streaming Audio . . . . . . . 56 Jack Location . . . . . . . . . . . . . . . 69 Jack Operation . . . . . . . . . . . . . 69,70 Jacking Instructions . . . . . . . . . . . . 70 Jump Starting . . . . . . . . . . . . . . . 74 Key Fob . . . . . . . . . . . . . . . . . . . 8 Key Fob Programmable Features . . . . . 57 Lane Change Assist . . . . . . . . . . . .
INDEX Theft Alarm (Security Alarm) . . . . . . . . 9 Theft System Arming . . . . . . . . . . . . 9 Theft System Disarming . . . . . . . . . . 9 Tilt Steering Column . . . . . . . . . . . . 16 Tires Air Pressure . . . . . . . . . . . . . . . 88 Changing . . . . . . . . . . . . . . . . 69 Jacking . . . . . . . . . . . . . . . . . 69 Pressure Warning Light . . . . . . . . . 64 Spare Tire . . . . . . . . . . . . . . . . 69 Towing . . . . . . . . . . . . . . . . . . . 62 24-Hour Towing Assistance . . . . . . .
FAQ (How To?) FREQUENTLY ASKED QUESTIONS GETTING STARTED • How do I install my LATCH Equipped Child Seat? pg. 11 • How do I fold down my rear seat? pg. 14 ELECTRONICS • Which radio is in my vehicle? pg. 26, 28, 30, 39 • How do I activate the Audio Jack? pg. 27, 30, 33, 42 • How do I set the clock on my radio? pg. 26, 28, 31, 40 • How do I use the Navigation feature? pg. 45 • How do I pair my cell phone via Bluetooth® with the UConnect™ Hands-Free Voice Activation System? pg. 51 • How do I use my iPod®? pg.
If you are the first registered retail owner of your vehicle, you may obtain a complimentary printed copy of the Owner’s Manual, Navigation/Media Center Manuals or Warranty Booklet by calling 1-800-247-9753 (U.S.) or 1-800-387-1143 (Canada) or by contacting your dealer. The driver’s primary responsibility is the safe operation of the vehicle. Driving while distracted can result in loss of vehicle control, resulting in a collision and personal injury.
Download a FREE electronic copy of the Owner’s Manual or Warranty Booklet by visiting the For Owners tab at: www.chrysler.com (U.S.) or www.chrysler.ca (Canada). 2012 USER GUIDE THE CHRYSLER � �� 12C41-926-A A • 200 • FI R S T ED ITI O N • u ser g u ide 918057_12a_200_User_Guide_051111.