
User's Manual

2
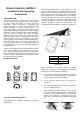
Less Sensitive More Sensitive
FIGURE 3
5. Do not locate the detector in a position where it is
subject to excessive vibration.
6. Ensure that the position selected for the PIR detector
is within effective range of the system, (refer to System
Installation and Operating Manual).
Note: When the system is armed, household pets
should not be allowed into an area protected by a PIR
detector as their movement would trigger the PIR and
generate an alarm.
Installation
Ensure that the system is in Test Mode.
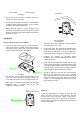
1. Undo and remove the fixing screw from the bottom
edge of the detector. Carefully pull the bottom edge of
the detector away from the rear cover and then slide
down to release the top clips. (FIGURE 2)
FIGURE 2
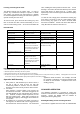
2. Carefully drill out the required mounting holes in the
rear cover using 3mm drill according to whether the
unit is being mounted in a corner or against a flat wall.
Note: Using 1
st
mounting hole to fulfill corner mounting
installation, while 2
nd
mounting hole for flat wall
installation. (FIGURE 3a & 3b)
FIGURE 3a
Corner mounting
FIGURE 3b
3. Using the rear cover as a template, mark the positions
of the fixing holes on the wall.
4. Fix the rear cover to the wall using the two 18mm No.4
screws and 25mm wall plugs, (a 5mm hole will be
required for the wall plugs). Do not over-tighten the
fixing screws as this may distort or damage the cover.
5. Configure the detector as described below.
Remember that on initial installation that the device
needs to be tested.
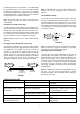
6. Check that the detector PCB is located and set in the
correct position to provide the required detection range.
To adjust the PCB position, simply slide it up or down
ensuring that the location legs are aligned with the
required position number marked on the board.
7. To refit the detector to the rear cover and locate the
clips in the top edge into the rear cover. Push the
lower edge of the detector into place and refit the fixing
screw in the bottom edge of the detector to secure in
position. Do not over-tighten the fixing screws as this
may damage the casing.
Warm-Up
It will take approximately 2 minutes to warm up after
battery has been connected. During this time, LED will
flash red once every 3 seconds. When a long beep is
sounded with red LED turns on steadily for 5 seconds, it
implies warm-up procedure is completed and the detector
is ready for detection.