
User Manual


Table Of Contents
- Manual
- Preface
- Chapter 1: Quick Start Guide
- Chapter 2: Storage Devices, Mouse, Audio & Printer
- Chapter 3: Power Management
- Chapter 4: Drivers & Utilities
- What to Install
- Driver Installation
- Manual Driver Installation
- Updating/Reinstalling Individual Drivers
- User Account Control (Win Vista)
- Windows Security Message
- New Hardware Found
- Driver Installation Procedure
- Chipset
- Video
- Audio
- Modem
- LAN
- TouchPad
- Card Reader/ExpressCard
- Hot Key
- Intel MEI Driver
- e-SATA Support
- Optional Drivers
- Wireless LAN
- PC Camera
- 3.5G Module
- Fingerprint Reader Module
- Intel Turbo Memory Technology Driver
- Chapter 5: BIOS Utilities
- Overview
- The Power-On Self Test (POST)
- The Setup Utility
- Main Menu
- Advanced Menu
- Installed O/S (Advanced Menu)
- SATA Mode Selection (Advanced Menu)
- DFOROM (Robson) Support (Advanced Menu > SATA Mode Selection [AHCI]
- Boot-time Diagnostic Screen: (Advanced Menu)
- Legacy OS Boot: (Advanced Menu)
- Reset Configuration Data: (Advanced Menu)
- Power On Boot Beep (Advanced Menu)
- Battery Low Alarm Beep: (Advanced Menu)
- Fan Control (Advanced Menu)
- Security Menu
- Boot Menu
- Exit Menu
- Chapter 6: Upgrading The Computer
- Chapter 7: Modules
- Chapter 8: Troubleshooting
- Appendix A: Interface (Ports & Jacks)
- Appendix B: NVIDIA Video Driver Controls
- Appendix C: Specifications
- Appendix D: Windows XP Information
- DVD Regional Codes
- Windows XP Start Menu & Control Panel
- Audio Features
- Function/Hot Key Indicators
- Video Features
- NVIDIA Video Driver Controls
- Power Management Features
- Configuring the Power Button
- Battery Information
- Driver Installation
- Bluetooth Module
- Wireless LAN Module
- PC Camera Module
- 3.5G Module
- Fingerprint Reader Module
NVIDIA Video Driver Controls
Display Modes B - 11
B
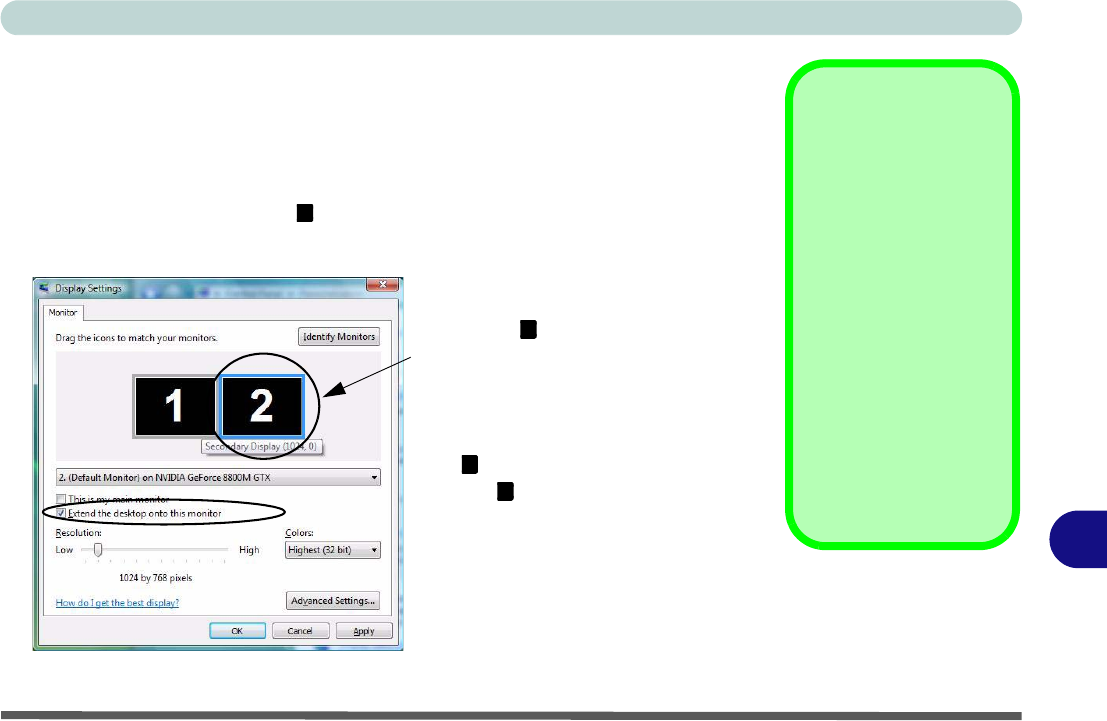
Using Display Settings to Enable Extended Mode
1. Attach your external display to the DVI-Out Port or HDMI-Out port, and turn it on.
2. Click Start, and click Control Panel (or point to Settings and click Control
Panel).
3. Click Adjust screen resolution under the Appearance and Personalization
menu (or double-click Personalization > Display Settings).
4. Click the monitor icon (e.g. ), and make sure you have checked “Extend the
desktop onto this monitor.” and click Apply.
Display Settings
Extended Desktop
Use the control panel to
drag the monitors to
match the physical ar-
rangement you wish to
use.
You can drag any icons
or windows across to ei-
ther display desktop,
which makes it possible
to have one program
visible in one of the dis-
plays, and a different
program visible in the
other display.
Figure B - 8
Display Settings
(Extend the
Desktop)
2
Click the appropriate monitor
icon (e.g. ) to be able to select
the option to extend the desktop
on to it.
In this example the Primary mon-
itor is on the left, the secondary
display is on the right.
2
1
2