
Installation instructions


Installation Instructions K2C Series
13
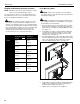
Recessed Mounting Holes
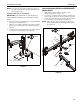
1. Ensure Centris bracket is able to swivel and tilt easily, yet
still be tight enough to hold display in desired position.
Adjust as required before proceeding. See “ADJUSTMENT”
for detail.
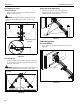
2. Carefully place display face down on protective surface.
3. Place the four spacers (D) over each of the mount holes on
the back of the display. (See Figure 12)
4. Pick up and orient the mount (A) so that the mounting holes
are aligned with the holes in the spacers; rotate the bracket
as required. (See Figure 12)
5. Using Phillips screwdriver, install four M4x25mm screws (C)
through the mounting holes, through the spacers and into
the display. (See Figure 12)
6. Tighten all four screws. Do not overtighten!
Figure 12
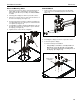
K2C22H Models
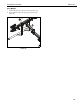
1. Remove quick release faceplate from mount by pulling
quick release lever and sliding faceplate off mount. (See
Figure 13)
Figure 13
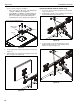
2. Carefully place display face down on protective surface.
3. Connect faceplate to display
For flush mounting hole installation:
• Using Phillips screwdriver, carefully install four
M4x14mm screws (B) through corresponding
holes on faceplate and into the mounting holes on
the display. (See Figure 14)
Figure 14
(D) x 4
5
(C) x 4
(A)
3
quick release lever
1
1
(B) x 4
quick release
faceplate
(for flush mounting holes)
3