
Installation instructions


Installation Instructions K2C Series
11
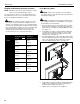
NOTE: If mount leans forward after installation, install one or
two shims (L) in between mount base and rail as shown
in the following steps.
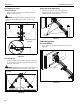
Installing Shim Spacers (if required)
IMPORTANT ! : Do NOT install one or both shims (L)
unless required as damage to the Frame One rail may
result!
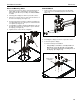
6. Remove two #10-32 x 7/8” flat head cap screws (M) holding
mount base to channel plate (K).
7. Slide one or two shims (L) in between mount base and rail,
lining up holes on shim(s) with holes on plate and rail. (See
Figure 9)
8. Use two #10-32 x 7/8” flat head cap screws (M) to reinstall
mount base to channel plate (K). (See Figure 9)
Figure 9
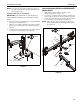
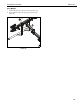
Array Installation (K2C22H and K2C22HSXF1
Models ONLY)
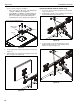
1. Slide rotational spacer (J10) into opening on array
attachment bracket. (See Figure 10)
2. Use 5/16-18 x 3" button head cap screw (J3), two thin steel
washers (J8), plastic spacer (J9), pocket washer (J5), pivot
pin (J4), pivot point spacer (J12) and 5/16-18 lock nut (J6)
to secure array (J1) to K2 arm (A). (See Figure 10)
NOTE: Cable clip (J11) can be used in place of pivot point
spacer (J12) if additional cable management is desired.
(See Figure 10)
Figure 10
(L) x 1 or 2 (if required)
7
8
(M) x 2
(J10)
1
(J3)
2
(J9)
(J8) x 2
(J5)
(J1)
(J4)
(J6)
(A)
or
(J12)
(J11)