
User Manual

2/14/2018 Water Linked Underwater GPS Documentation
http://docs.bluerobotics.com/waterlinked/ 2/3
Installation
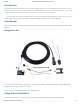
Before the first use, you need to install the Analog Locator (A1) on the BlueROV2. The locator will use
one of the spare cable penetrations in the back of the BlueROV2 and will connect to the spare green
and white twisted pair in the tether.
Here’s our recommended installation instructions.
1. Loosen the enclosure clip screws at the front of the top enclosure and remove the tube from the
ROV.
2. Using the silver cable penetrator wrench, loosen and remove one of the spare cable penetrators.
3. Install the Analog Locator (with pre-installed penetrator) into the hole and tighten with the
penetrator wrench.
4. Using the pre-crimped header pin connector on the Analog Locator, connect the locator wires
(green/white) to a spare twisted pair of the tether (green/white). If the tether does not have a
matching connector, you can a) install one, b) hardwire the connection instead, c) use a terminal
block for wire to wire connection (not provided).
5. Route the locator to the side of the ROV and use the included aluminum mounting bracket to
secure to the existing holes on the ROV.
6. That’s it! Close up the enclosure, vacuum test to ensure a good seal, and you’re ready to dive!
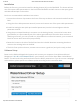
Software Setup
Power on the ROV and Waterlinked system, and connect your computer. Start QGroundControl.
Navigate to192.168.2.2:2770/waterlinkedin your browser, and click the ‘Start Water Linked Driver’
button. This will need to be performed each time the ROV is powered on. If you do not see a webpage
at this address, please perform a software update according to the instructionshere.