Piglet Aerial Photography / Real-time FPV / WiFi Control Heading Hold Mode / Low Battery Alarm Out of Range Alarm / One Button Take Off/Landing High/Low Speed Mode / Custom Route Mode Altitude Hold Mode U36W User Manual
www.udirc.
www.udirc.com Important Statement Thank you for buying UDIRC's product. People who under 14 years old must not use the product. Please read this brochure carefully before using the product. You are regarded as accepting all content in this user manual when using this drone. This product is not an ordinary toy but a piece of complicated equipment which is integrated with professional knowledge by mechanic, electronic, air mechanics, high-frequency emission etc.
www.udirc.com (1) Flying Area The flying field must be legally approved by your local government. Do not fly the drone near in the airport. Keep far away from the airport more than 5km when flying a RC drone. Flying field must spacious enough and we suggest at least 8M (length)*8M (width)*5M (height). (2) Use correctly For safety elements, please only use UDIRC’s spare parts to replace the damaged parts.
www.udirc.com (5) Safe operation Please operate the RC drone in accordance with your physical status and flying skill. Fatigue, listlessness and improper operation may increase the rate of accident. (6) Keep away from rotating parts Rotating parts like propellers or motors may cause serious injury and damage. Keep face and body away from rotating parts. (7) Keep away from heat The RC drone is made of metal, fiber, plastic, electronic components etc.
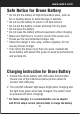
www.udirc.com Safe Notice for Drone Battery * Do not put the battery on high temperature place, such as fire or heating device to avoid damage or explode. * Do not use the battery to crash or hit hard surface. * Do not put the battery in water and keep it in dry place. * Do not open the battery. * Do not leave the battery without supervision when charging. * Make sure that there is no short circuit of the power wire. * Please use the recommended charger only.
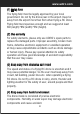
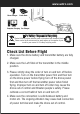
www.udirc.com Phone Charger Power Bank Computer Charging Car Charger Li-Po Battery Disposal & Recycling Wasted Lithium-Polymer batteries must not be placed with household trash. Please contact local environmental or waste agency or the supplier of your model or your nearest Li-Po battery recycling center. Check List Before Flight 1. Make sure the drone battery and transmitter battery are fully charged. 2. Make sure the Left Stick of the transmitter in the middle position. 3.
www.udirc.com 5. Improper operation may cause drone crash, which may arouse motor defective and noise, and then effect the flying status or even stop flying. Please go to the local distributor to buy new parts for replacement so that the drone will return to its best status.
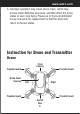
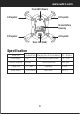
www.udirc.com Front LED (Green) A Propeller B Propeller Drone Bottom Housing B Propeller A Propeller Rear LED (Red) Specification Drone Size Drone Weight Propeller Diameter Flying Time Drone Battery 66x66x37mm Charging Time for Drone Battery 25~30 mins 23g Max Flying Distance/Radius 10~15 m Camera Resolution 640*480 Ø32mm 5~7 mins Frequency 2.4Ghz 3.
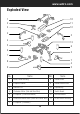
www.udirc.com Exploded View 1 10 2 11 12 3 2 2 4 13 5 6 6 2 7 7 4 5 8 9 No. Name No.
www.udirc.
www.udirc.com Brief Introduction for Button Functions Left Stick Move the Stick to forward / backward / left / right to fly the drone to up / down / turn left / turn right. Right Stick Move the Stick to forward / backward / left / right to fly the drone to forward / backward / left / right. Power Switch Push up the power switch to turn on the transmitter, and pull down to turn off. Heading Hold Mode Press the button to enter heading hold mode, and press again to exit from heading hold mode.
www.udirc.com Notice: 1. Make sure the electrodes are correct. 2. Do not mix new with old batteries. 3. Do not mix different kinds of batteries. 4. Do not charge the non rechargeable battery. Pre-flight Operation Instruction Frequency Pairing 1. Turn on the transmitter switch (Picture 1) and the power indicator light flashes rapidly. Push the Left Stick all the way down to the lowest position and then release. The Left Stick will back to the middle position automatically.
www.udirc.com Important Notice: Please make sure the drone is placed on the horizontal position after powering on the drone, so that the drone can work well. Checklist before Flight 1. The camera is in front of the drone. Keep the drone front away from you. 2. Power on the drone and check the direction of the rotating propellers. The left front and right rear A propellers rotating clockwise while the right front and left rear B propellers rotating counterclockwise. 3.
www.udirc.com Calibration Instruction Please follow below steps to calibrate the drone if the drone becomes imbalance after crashing during the flight, and can not be adjusted by trimmer button and cause difficult operation. 1. Power off the drone, then turn off the transmitter switch. 2. Turn on the transmitter switch, push the Left Stick all the way down to the lowest position (Picture 6) and then release. The Left Stick will back to the middle position automatically (Picture 7).
www.udirc.com Flying Control Notice: Every time before the drone take off, move the Left Stick and Right Stick at the same time as Picture 5 shown(45 degree inward) to start the motors. Push up the Left Stick slowly to fly up the drone or press down the one button take off .
www.udirc.
www.udirc.com Forward and backward trimmer When take off, if the drone tilts forward, press down the left stick in the center, and push the right stick backwards. Otherwise push forwards. Left and right turning trimmer When take off, if the drone head rotates to left,then press down the left stick in the center and push left stick to right. Otherwise push to left.
www.udirc.com Functions Introduction Two Take Off Methods 1. Method 1 (Take off) : After frequency pairing successful, then move the Left Stick and Right Stick at the same time as Picture 5 shown(45 degree inward) to start the motors. Push up the Left Stick to fly up the drone to certain altitude and then release the stick. 2. Method 2 (One Button Take Off): Press the Take Off / Landing / Emergency Stop Button (Picture 9) , the drone will fly up automatically and keep flying at an altitude of 1.
www.udirc.com ▲Emergency Stop: When the drone in emergency situation and going to hit the walking people or obstacle etc., press the Take Off / Landing / Emergency Stop Button immediately and hold it for more than 1s. The propellers will stop immediately. Tip: Do not use the emergency stop function unless in emergency situation. The drone will fall down suddenly after all propellers stop.
www.udirc.com High / Medium/Low Speed Mode Switch Low Speed Mode(Mode 1) 1. Low Speed Mode is suitable for beginner. Medium speed Mode(Mode 2) 2. Medium Speed Mode is suitable for skillful pilots to play in the gentle breeze. High Speed Mode(Mode 3) 3. High Speed Mode is suitable for expert to experience aerial stunt in outdoor. High / Medium/Low Speed Mode Switch Heading Hold Mode * Drones generally have a front and rear indicated by LED lights or colored propellers.
www.udirc.com Heading Hold Mode is designed for beginners and users who fly the drone in daylight or at a far distance. When the drone in heading hold mode, push the Right Stick to forward / backward / left / right, and the drone will fly to forward / backward / left / right accordingly. Prerequisite: Position the drone in such a way that its front is your front (see Picture 1). Tip: Do not change the orientation of the transmitter (see Picture 2) after entering heading hold mode.
www.udirc.com Low Battery Alarm When the transmitter in low battery, the transmitter will beep Di-di-di... to remind the user to land the drone to replace the batteries as soon as possible. Or the drone may be out of control. When the drone in low battery, the transmitter will beep Di.di.di... constantly to remind the user to land the drone as soon as possible. The flip function will turn off automatically when the drone in low battery.
www.udirc.com Spare Parts Installation Instruction Propeller Installation and disassembly Diagram When disassemble, pull up the propeller in the vertical direction (Picture 11) and remove as Picture 12. Notice: Because the propeller is blowing up structure, it should keep a bit gap between the motor housing and the propeller( Picture 13). Picture 11 Picture 12 About 0.
www.udirc.com Propellers guards installation and disassembly diagram When disassemble, remove one side of the guard from the buckle, and then pull out ( Picture 14). When install, aim the groove of the motor housing buckle and then press down (Picture 15). Picture 14 Picture 15 To know your APP Download and Install the APP: Flyingsee The APP is suitable for mobile phone with iOS and Android system, please download from the mobile phone software store: 1.
www.udirc.com 3. Scan the QR code on the right or the QR code in the box to download Flyingsee. Frequency Pairing between Mobile Phone and Drone WiFi: 1. Power on the drone. Put the drone on the flat surface in horizontal position. 2. Enter “set up” of the mobile phone, turn on WiFi (WLAN) and choose udirc-***, return to desktop after successful connection. 3. Click on the icon Flyingsee and click on to enter remote control interface to experience real time transmission.
www.udirc.com HOME Explore UDIRC Drone EMERGENCY Learn the operation of drone Flyingsee Remote control interface Help 100% Media Real time Transmission Interface Click on the icon Home Page 4. Click on to enter Virtual Control Interface. At this time the drone LED lights change from flash to solid bright, which indicates successful frequency pairing and the drone is ready to be controlled via APP.
www.udirc.com Introduction for APP Icons Home Page Icons Explore UDIRC Drone Help Learn the operation of Drone Media Remote control interface Remote Control Interface Home Page Icon Click on the icon and back to home page. Virtual Reality Mode Click on the icon to enter virtual reality mode to experience first person view (only available when using with a VR headset). Click on the icon again to exit from virtual reality mode.
www.udirc.com Flight Route Setting Mode Click on this icon and it turns red. Draw a flight route in the right area. The drone will fly according to the flight route. Click on the icon again to exit from Flight Route Setting Mode. The icon turns white. EMERGENCY Emergency Stop The icon is red by default. Click this icon and the propellers will stop immediately. The drone will fall down to the ground straightly. Tip: Do not use the emergency stop function unless in emergency situation.
www.udirc.com Remote Control Virtual Control Stick The virtual control stick is hidden by default. Click on the icon to turn on the virtual control stick. Gravity Induction Mode Click on this icon to enter gravity induction control mode. (only available for flying left / right and forward / backward). Click on the icon again to exit from gravity induction control mode. If the mobile phone shakes to the left / right, the Right Ball will move accordingly causing the drone to fly left / right.
www.udirc.com Video Click on this icon to record video. The recording time will show at the bottom of the screen. Click on this icon again to finish recording. Photo Click on this icon to take photo. Heading Hold Mode Click on this icon and it turns red, which indicates that the drone enter Heading Hold Mode. Click again to exit from Heading Hold Mode. The icon turns white. Media Click on this icon to view or delete the aerial video and photo. Click on the arrow to exit.
www.udirc.com One Button Landing Click on this icon and the icon turns red, the drone will fly down slowly and land on the ground. All propellers also will stop. The video and the photos are stored in the local phone gallery, you can display it in the phone directly, or you also can display it in the APP via quick icon to enter Media interface. Notice: App must be authorized to access the phone gallery, if not, then may be unavailable to display the video and photos.
www.udirc.com APP Flying Control Take off EMERGENCY Click on this icon and it turns red shortly. The drone will fly up automatically and stay flying at an altitude of 1.2 meters. 00:00 To fly up or down: To fly right or left: Move the Left Ball up to fly the drone up and move the Left Ball down to fly the drone back down. Move the Right Ball to the left to fly the drone to the left, and move the Right Ball to the right to fly the drone to the Right Ball right.
www.udirc.com If the drone tilts forward or backward Click the “-” of the Forward / Backward Trimmer to adjust the drone till balance if the drone tilts forward. Click the “+” to adjust the drone till balance if the drone tilts backward. If the drone rotates to left or right Click the “+” of the Rotation Trimmer till balance if the drone rotates left. Click the “-” to adjust the drone till balance if the drone rotates right.
www.udirc.com Spare Parts For convenience, the spare parts are listed for you to choose, which can be purchased from the local seller.
www.udirc.com U36W-10 Camera Board U36W-11 Receiving Board U36W-12 USB Cable U36W-13 Transmitter Important Notice Our company's products are improving all the time, design and specifications are subject to change without notice. All the information in this manual has been carefully checked to ensure accuracy, if any printing errors, our company reserve the final interpretation right.
The drone is underpowered or can not fly. 3 1 2 The transmitter indicator light is off Fail to pair the drone with transmitter Problem No. 1. The same as above 1.2.3. 1. Indicator light is off. 3. Operate the drone step by step in accordance with the user manual. 4. To buy spare parts from local seller and replace damaged parts. 1. Replace the propeller. 2. Recharge the drone battery. 3. Install the propeller in accordance with the user manual . 3. Misoperation. 4.
The drone could not hover and tilts to one side. The drone indicator light is off. Could not see the picture. Hard to control by cellphone. 4 5 6 38 7 1. Practice and read the cellphone controlling instruction carefully. 3. Buy a new camera box from local seller to replace. 3. Damaged camera. 1. Not experienced enough. 2. Cut off the wire and re-connect. 2. There is interfering signal nearby. 1. Check the wire and connect well. 2. Buy a new battery from local seller to replace the battery.
www.udirc.com FCC Information This equipment has been tested and found to comply with the limits for a Class B digital device, pursuant to part 15 of the FCC Rules.These limits are designed to provide residential protection against harmful interference in a residential installation. This equipment generates, uses and can radiate radio frequency energy and, if not Installed and used in accordance with the instructions, may cause harmful interference to radio communications.
www.udirc.com FCC WARNING: The equipment may generate or use radio frequency energy. Changes or modifications to this equipment may cause harmful interference unless the modifications are expressly approved in the instruction manual. Modifications not authorized by the manufacturer may void user’s authority to operate this device. This device complies with part 15 of the FCC Rules.