
Installation Guide Part 1


NGL FX Installation Manual Rev. *
28 of 84
Concrete Surface Installation
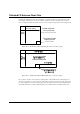
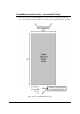
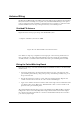
For mounting to concrete, use a 5/16” lead anchor and a #12 x 1 ½” panhead screw (CKP P/N
366291). Lead anchor (0.79cm) is a Power Fastener (P/N 09439). Screw is 0.55cm x 3.8cm.
Figure X***: Concrete Installation
Mounting the Power Supply
The power supply can be mounted near the electronics enclosure or, by space requirements, in
another remote location. If the power supply is installed above a drop ceiling or in the plenum
(HVAC ventilation), the Above Ceiling Conversion Kit must be ordered in advance.
For the unit’s weight and dimensions, refer to the Appendix “Power Supplies” section.
GS-599ES(R) Installation
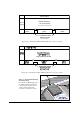
Hold the unit in place and mark the screw hole locations. Secure the power supply in its intended
location using the same instructions found above (refer to “Mounting the Electronics Enclosure”).
GS-599MC-KIT(R) Installation
Refer to Appendix 1 for the complete hood kit instructions.
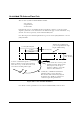
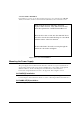
Drill a hole into the base material to the depth
required. The tolerances of the drill bit used should
meet the requirements of ANSI Standard B212.15.
Blow the hole clean of dust and other material. Insert
the anchor into the hole until the flange is seated flush
with the surface of the base material.
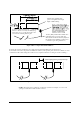
Position the fixture. Insert the screw tip through the
fixture into the anchor and tighten.