
User's Manual
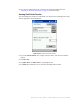


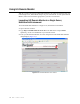
Table Of Contents
- Table of Contents
- Introduction
- Application Server
- Patron Self-Checkout Station
- Portable Inventory Reader
- ILS Remote Monitor
- Exception Ticket Printer
- CheckVIEW
- Affixing Tags
- Using Tag Programming Station
- Using DiscMate
- CheckPASS
- Troubleshooting Guide
- System Maintenance

ILS Remote Monitor: Setting Up and Managing User Accounts 5-5
Setting Up and Managing User Accounts
The Remote User Manager utility lets you create and manage accounts that provide
access to the ILS Remote Monitor. The utility also lets you unlock accounts that have been
disabled as a result of incorrect username-password combinations.
Table 5.1 lists the access privileges you can assign to each user:
Users assigned the Remote Console access privilege see only the features they are
empowered to use. Users assigned Remote Report, Administrator, or Customer Service
access privileges see all ILS Remote Monitor features.
Adding a User Account
Take the following steps to add a user account to provide access to the ILS Remote
Monitor:
1 In the Intelligent Library System Control window, select Maintenance > Remote
User Manager (Figure 5.4).
Figure 5.4
Select Remote User Manager
2
Log on as ILSRemote, password remote123.
3 Click Add (Figure 5.5).
4 Type a user name and password.
Table 5.1
Remote User Manager Access Privileges
Access Privilege Description
Remote Console View status of any or all branches.
Remote Report Access all ILS Remote Monitor functions: view status, view and
print reports, upload inventory files.
Administrator Access all ILS Remote Monitor functions: view status, view and
print reports, upload inventory files. Access Application Server
operations.
Customer Service Access all ILS Remote Monitor functions: view status, view and
print reports, upload inventory files. Access Application Server
operations.