Ultrasonic Thickness Gage Quick Guide v. 3.
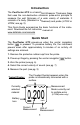
Introduction The PosiTector UTG is a hand-held Ultrasonic Thickness Gage that uses the non-destructive ultrasonic pulse-echo principle to measure the wall thickness of a wide variety of materials. It consists of a body (Standard or Advanced) and probe (UTGC or UTGM, see pg. 2). This Quick Guide summarizes the basic functions of the instrument. Download the full instruction manual at: www.defelsko.com/manuals Quick Start The PosiTector UTG powers-up when the center navigation button is pressed.
Probes To disconnect a probe from a body, power-down the instrument and slide the plastic probe connector horizontally (in the direction of the arrow) away from the body. Reverse these steps to attach a new probe. When powered-up the PosiTector automatically determines what type of probe is attached and does a self-check. PosiTector UTG probes transmit an ultrasonic pulse into the material to be measured. This pulse travels through the material towards the other side.
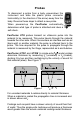
t2 t3 Probe t1 t1 t2 t3 Coating Probe The PosiTector UTGM in multiple-echo mode determines thickness by measuring the time between at least three consecutive back wall echoes. steel Figure 2 In the figure above, multiple-echo mode measures only the time between echoes. Regardless of whether the steel is coated or not, all times between echoes are the same.
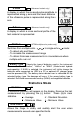
When the probe senses echoed ultrasound, a coupled symbol will appear on the display and thickness values will be displayed. While the probe is coupled, the PosiTector UTG continually updates the display. 3. When the probe is removed from the surface, the last measurement will remain on the display. Occasionally, excess couplant will remain on the probe when the probe is lifted from the surface.
Calibration, Verification and Adjustment Three steps ensure best accuracy… 1.Calibration - typically done by the manufacturer or a qualified lab. All probes include a Certificate of Calibration 2.Verification of Accuracy - as done by the user on known reference standards such as calibration step blocks. 3.
Cal Settings Menu Zero PosiTector UTG probes can be "zeroed" to compensate for temperature and wear. This action is not required when operating in multiple-echo mode (UTG M probes only) except when the instrument is new and after a Reset (pg. 8). However it ensures best accuracy when operating in SE (single-echo) mode. Therefore it is a good idea to "zero" the probe before each work shift and when the temperature of the part changes. During zeroing, it does not matter what the current velocity setting is.
Thickness The most common method of adjustment is to measure a sample of known thickness. Select a reference standard of material as close as possible in composition to the intended application. For best results, the thickness of the reference standard should be equal to or slightly greater than the thickness of the part to be measured.
Setup Menu Reset Reset (soft reset) restores factory settings and returns the instrument to a known condition. The following occurs: - All batches, stored measurements, images, and batch names are erased. - All calibration adjustments are cleared and returned to the Gage’s factory calibration settings.
A Scan (Advanced models only) A display in which the received pulse amplitude is represented along y axis and the travel distance of the ultrasonic pulse is represented along the x axis. B Scan (Advanced models only) A display in which a cross sectional profile of the test material is represented.
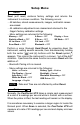
Memory Management The PosiTector UTG can record readings in memory for printing to the optional Bluetooth wireless printer, downloading or synchronizing with PosiTector.net. Readings are time-stamped as they are taken. Scroll through display modes (Advanced only) Create a new batch (Advanced only) Delete last reading Restore brightness after dimming (Advanced only) Access the Menu Standard models store up to 250 readings in one batch. Advanced models store 100,000 readings in up to 1,000 batches.
Connect Menu Sync Now Immediately initiates synchronization with PosiTector.net when connected (USB or Bluetooth) to an internet connected PC running PosiTector Desktop Manager. Auto SYNC Allows the instrument to automatically synchronize with PosiTector.net when initially connected to an internet connected PC running PosiTector Desktop Manager.
Returning for Service Before returning the instrument for service… 1.Install new or newly recharged batteries in the proper alignment as shown within battery compartment. 2.Examine the probe tip for dirt or damage. 3.Perform a Hard Reset (pg. 8) and a Zero (pg. 6) If you must return the instrument for service, describe the problem fully and include measurement results, if any. Be sure to also include the probe, your company name, company contact, telephone number and fax number or email address.