MTMDP Torque Display With Multiple Internal Transducers USER'S GUIDE November, 2007 ADVANCED WITNESS SERIES, INC. 910 BERN COURT #100 SAN JOSE, CA 95112 (408) 453-5070 mwww.awitness.
CONTENTS 1 CONTENTS CONTENTS.................................................... 1 INTRODUCTION............................................. 2 Description ......................................................... 2 System Specifications ......................................... 2 OPERATION .................................................. 3 Display Operation................................................ 3 Button Function .................................................. 4 Rear Panel Inputs...........
INTRODUCTION 2 INTRODUCTION DESCRIPTION The MTMDP Torque Display is designed to provide for a wide range of torque testing applications in the smallest foot print at a very reasonable price. Features include an LCD graphics display, built-in battery pack for remote testing and an optional Intellect External port for easy expansion with our entire line of torque and load transducers.
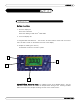
OPERATION 3 OPERATION DISPLAY OPERATION Button Function: 1: Turns the display On Zero's the Transducer Clears the reading in Peak and 1st Peak Mode 2: Turns the display Off 3: Programmable 'Soft Buttons'. The function of these buttons varies with the current menu set and is shown on the bottom two lines of the display. 4: Accepts the reading into memory Scrolls back one level in the menu system 1 4 2 3 Special Note: MTMDP-2S PTEST is a modified version of the MTMDP series.
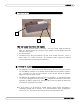
OPERATION 4 BUTTON FUNCTION REAR PANEL INPUTS 3 2 1 The rear panel has three (3) inputs: 1. DC in. This is the main power in connector. Use only a power supply provided by AWS, Inc., Part No. DCPA-110. Using the wrong voltage or reverse polarity will cause damage to the system. 2. RS-232 connector. 3. Transducer Input: Plug the transducer into this 12 pin circular connector. This is a PUSH LOCK, not a Twist connector.
OPERATION 5 RS-232 The MTMDP display can be connected to a printer, computer or data collector via its RS232 interface. Every time a reading is accepted into memory, a peak is cleared, or data is transmitted via the print data menu(s), it is transmitted via the RS-232 port. To download the readings, go to the DATA MENU. SPECIAL NOTE: Model MTMDP-2S PTEST is not equipped with memory, so the operation of the RS-232 will vary from the standard unit. The protocol, however, remains the same.
PROGRAMMING 6 PROGRAMMING & NAVIGATION ENTERS THE MENU SELECTS MODE SYSTEM OF OPERATION The AWS product line has been newly redesigned to provide a consistent interface throughout the product line. We have made the user interface menu driven, as opposed to 'hard coded'. This has provided several advantages. First, once you learn the basics, you can operate any of our products with the shortest learning curve possible.
PROGRAMMING 7 MENU LOCATION MENU ACTION MENU SCROLL RETURNS TO BUTTONS BUTTONS PREVIOUS MENU MENU TREE Operation Overview: There are 7 buttons on the display face: Off, On/clr, ENT and four (4) programmable or ‘soft’ buttons. The exact function of the soft buttons is defined by the bottom two rows of text and will vary depending on the current mode of operation. Pressing the ENT button will take you back to the previous screen, until you return to the run mode.
PROGRAMMING 8 MENU: Enter menus. MENU Operation: ENT: Previous menu. Up and Down: Scroll through the current menu. Programmable keys: Menu actions. The text varies depending of the active menu selection. MENU TREE: 1 PEAK OPTIONS MENU SEL: Enters menu. 1-1 Auto clear +, - Set time in seconds. 1-2 Filter +, - Set filter value in Hz. 1-3 Peak Blanking +, - Set blanking in percent of full scale. 1-4 Sign Lock +, - Toggle On or Off. 1-5 Edit Limits High or Low edits that limit.
PROGRAMMING 9 2-2-3 Scroll Lockout +, -: Toggle on or off. 2-3 Contrast +, -: Change the contrast of the display. 2-4 Information SYS: Gives detailed info about the system. TD: Gives detailed info about the transducer. 3 DATA MENU SEL: Enters menu. 3-1 Print Memory Send: Prints the currently saved readings. 3-2 Clear Memory CLR: Followed by ENT clears the readings saved in memory. 3-3 Reset All CLR: Followed by ENT clears all readings and all sets. Should be used approximately every 5000 readings.
PROGRAMMING 10 DESCRIPTION OF FUNCTIONS The following is a description of the standard features of the MTMDP OPERATING MODE Current operating mode (Peak, 1st Peak or Track) will show on the display. Press the Πkey to toggles between them. Peak Displays and retains the maximum torque experienced by the wrench, as occurs when operating the wrench in the tightening direction. The Peak Mode is used for all power tools and some dial wrenches.
PROGRAMMING 11 ENGINEERING UNITS Shows the current engineering units. Press the ő key to cycle through the eight possible choices: Kgf m, KgfCm, gfCm, cNm, Nm, FT LB, IN LB, IN OZ. AUTO-CLEAR Auto-Clear works in Peak and 1st Peak Modes, freeing the operator from manually clearing the display after taking a reading. Auto-Clear can be set from one to nine seconds, or completely off.
PROGRAMMING 12 FULL SCALE This screen shows the Full Scale value of the Torque Shaft. This is not a field adjustable value. LOW LIMIT Use the low limit setting as a means of visually flagging the operator when a reading fails to reach a desired minimum value. A small down arrow will appear on the screen is a peak is captured below the limit setting. The limit is adjusted by using the navigation buttons to set the first four digits to the desired value.
SERVICE AND WARRANTY SERVICE To ensure the best possible support for our customers, Advanced Witness Series maintains a complete calibration and repair facility for all its products. We keep in stock most replacement parts for torque testers, transducers, and our line of digital wrenches. When you buy a product from us, the only place you need to go for parts and service is...us! For service, call (408) 453-5070, Monday through Friday, between the hours of 9:00am and 5:00pm Pacific Coast Time.