CHECK•LINE ® BY ELECTROMATIC LM6 LEATHER MOISTURE METER Operating Manual
TABLE OF CONTENTS 1.0 Introduction ………………………………………………………..….................... 2 1.1 Operation and handling 1.2 Measuring procedure 2.0 Calibration curves ……………….………………………………...…................. 3 2.1 Selection of calibration curves 3.0 Determination of the reference water content ………………….…........................... 4 3.1 Short description of norm DIN53304 4.0 Design of the device…................................................................................................. 5 4.
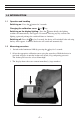
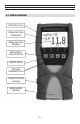
1.0 INTRODUCTION 1.1 Operation and handling Switching on: Press the button for 3 seconds. Changing the calibration curve: or key. Switching on the display lighting: Press the button briefly; the lighting switches off automatically after approx. 20 seconds. Pressing any key activates the lighting again and prolongs the switch-off time to 4 minutes. Switching off: Press the key for 5 seconds; the device will switch off after releasing the key. After approx.
2.0 CALIBRATION CURVES 2.1 NAME CALIBRATION CURVE DENSITY Leather LD Leather of low density 0.55 g/cm³ Leather CR Leather chrome tanned 0.60 g/cm³ Leather MD Leather of medium density 0.65 G/CM³ Leather FOC Leather free of chrome, fire protection leather 0.70 g/cm³ Leather HD Leather of high density 0.75 g/cm³ Leather VHD Leather of very high density 0.
3.0 DETERMINATION OF THE REFERENCE WATER CONTENT The humimeter LM6 determines the water content, which means that it calculates the moisture referred to the total mass (DIN53304): Mn − Mt %WG = × 100 Mn 3.1 Mn: Mass with average moisture content Mt: Mass of the dried sample %WG: Calculated water content Short description of norm DIN53304 Take a leather piece according to DIN 53302 T2 or DIN 53303 T2.
4.
4.1 Menu There are 3 menu levels Main menu The symbols show the key functions in Edit logs the different menus. Manual logs 1. Type selection: 2. Saving: 3. Clear logs Print logs Main Menu Last Logs Rolling menu: Use this key to enter the different menu levels and main menu. All logs Clear logs Power: Press this key for 3 seconds to switch the instrument off or on. Press this key briefly to activate the display lighting.
5.0 COMMON REASONS FOR INCORRECT MEASUREMENTS • Wrong calibration curve Double check the correct selection of the calibration curve before measuring. The calibration curve “reference” must NOT be used. • Inadequate thickness of the leather pile A single leather hide must NOT be measured. Pile the leather to ensure a thickness of at least 10 mm. • Metal below the material During the measurement there must NOT be any metal for at least 100 mm under the measured material.
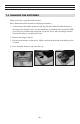
7.0 CHANGING THE BATTERIES Your new device is provided with batteries. Please find enclosed the manual for changing of batteries: 1. At first remove the rubber protective housing. For that, hold the rubber housing at the upper side and pull it over. If your humimeter is provided with an optional USB port, you have to remove the protection cap before. Press with your finger onto the arrow of the battery cap und pull it back. 2. Remove the empty batteries. 3. Put four new batteries in the device.
8.0 CALIBRATION 8.1 Checking the calibration We recommend to check the calibration of the humimeter LM6 every 4 weeks, using the proof plate delivered with the device. For this check the device has to show a temperature between 18.0 and 24.0°C. 1. Switch on the instrument and select the calibration curve “reference” using the arrow keys. 2. Hold the humimeter LM6 in one hand and press it onto the grey proof plate (compacting pressure of 4.0kg). The shown measuring value should range between 14.
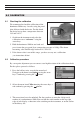
4. Press the third button as long as the black bar stands on the first digit of the serial number. After a waiting time of a few seconds the device accepts the entered digit. Now the other 3 digits have to be entered. When the 4-digit number has been entered correctly (see picture), press the button to confirm. 5. The request Reinitialize? will appear at the display. Hold the humimeter LM6 in one hand and make sure that nothing stands behind the measuring field (black plate). 6.
9.0 TECHNICAL DATA Measuring depth 0.197 in (5mm) Minimum material thickness 0.394 (10mm) Resolution 0.1% water content ; 0.1°C ; 0.3°F Measuring range 3% to 65% water content Temperature measuring range 14 °C to 122 °F (–10°C to +50°C) Operation temperature range 32 °F to 104 °F (0 °C to +40 °C ) Storage temperature –4 °F to 140 °F (–20°C to 60°C) Temperature compensation Automatic Memory for measured value Approx. 10.
WARRANTY ELECTROMATIC Equipment Co., Inc. (ELECTROMATIC) warrants to the original purchaser that this product is of merchantable quality and confirms in kind and quality with the descriptions and specifications thereof.
CHECK•LINE INSTRUMENTS ® ELECTROMATIC E Q U I P M E N T C O . , I N C . 600 Oakland Ave.