
Technical data
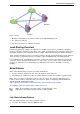


Working with Link Aggregation
Check Point VSX Administration Guide NGX R67 | 138
802.3ad - includes LACP and is the recommended mode, but some switches may not support this
mode.
XOR.
In Load Sharing mode, all the interfaces of a bond must be connected to the same switch. The switch itself
must support and be configured for Link Aggregation, by the same standard (802.3ad or XOR) as the
gateway bond.
Load Sharing needs Performance Pack to be running.
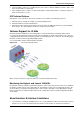
Creating a Bond in a New Deployment
This section presents procedures for creating a bond in a new VSX deployment. A new deployment is
defined as one in which no VSX Gateways, cluster objects or Multi-Domain Security Management Domain
Management Servers have been previously defined.
Note - You must also configure switches the 802.3ad standard.
Perform the following steps in sequence:
Creating Interface Bond in Load Sharing Mode 138
Defining Slave Interfaces as Disconnected 139
Setting Critical Required Interfaces 139
Setting Affinities 140
Verifying that the Bond is Functioning Properly 140
Creating the Cluster. 141
Creating Interface Bond in Load Sharing Mode
To create a new Interface Bond, perform the following steps on the VSX Gateway or all
cluster members:
1. From VSX gateway or cluster member command line, run sysconfig.
2. Select Network Connections.
3. Select Add new connection.
4. Select Bond.
5. Select each slave interface to be included in the bond, by entering the number corresponding to the
interface name.
Choose interfaces to be enslaved under the bond ('n' for next, 'e' to exit):
------------------------------------------------------------------
1) [_]eth0 3) [x]eth2 5) [_]eth4 7) [_]eth6
2) [x]eth1 4) [_]eth3 6) [_]eth5
------------------------------------------------------------------
(Note: configuration changes are automatically saved)
Your choice:
6. Type n to continue.
7. Select Load Sharing.
8. Choose the Load Sharing mode: 802.3ad or XOR.
9. Configure advanced parameters as follows:
a) If you wish to accept the default advanced parameters (recommended for most installations) enter 1
and then press n to continue. Proceed to the next step. See below for the default values