
Technical data


Working with URL Filtering
Check Point VSX Administration Guide NGX R67 | 127
Following category assignment, the Web Filtering engine then blocks or allows the traffic according to one or
more of the following rule types:
Network Exceptions: Override Web Filtering rules based on predefined combinations of source and
destination locations.
Address Rules: Traffic destined for specific URLs/IP addresses is either blocked or allowed according
to a Blocked List (blacklist) or an Allowed List (white list). These lists override decisions based on
categories.
Category Rules: Traffic is blocked or allowed according to the category assigned to it.
For example, if a URL or IP address matches two or more categories, and one of those categories is
blocked, the traffic is blocked. However, if the same address appears in the Allowed List or in a Network
Exception definition, the traffic is allowed.
Configuring URL Filtering
The following procedure describes the process for enabling URL Filtering on VSX objects. It is important to
note that you must configure all VSX cluster and VSX gateway objects before configuring virtual system
objects.
The process consists of two basic procedures:
1. Enabling URL Filtering on VSX objects (clusters, VSX gateways and Virtual Systems).
2. Defining the URL Filtering Policy and installing it on the appropriate objects.
Enabling URL Filtering
To enable URL Filtering, perform the following steps on each individual VSX object. You should enable URL
Filtering on all VSX objects before Virtual Systems.
1. In SmartDashboard, select a VSX object and open its property definition window.
2. On the General Properties page, select URL Filtering in the Check Point Products List to activate
URL Filtering for that specific VSX object.
3. Install the Policy.
4. Repeat these steps for each VSX cluster, VSX gateway, and Virtual System.
Defining the URL Filtering Policy
Perform the following steps to define the URL Filtering policy in SmartDashboard.
1. On the SmartDashboard Content Inspection tab, select URL Filtering > URL Filtering Policy.
The URL Filtering Policy window opens.
2. On the URL Filtering page, configure the following:
a) In the Category Selection list, select the URL categories to block.
A green icon indicates that URLs associated with this category are allowed.
A red icon indicates that URLs associated with this category are blocked.
b) In Track Configuration, select how to track a detected URL address. All options other than None
generate a log record in SmartView Tracker.
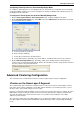
3. Select Advanced > Allow List to add a URL and/or IP address to be allowed even if it is associated
with a blocked category.
4. Select Advanced > Block List to add a URL and/or IP address to be blocked even if it is associated
with an allowed category.