
Technical data


Managing VSX Clusters
Check Point VSX Administration Guide NGX R67 | 115
6. Export VSLS configurations to comma separated value (CSV) text files
7. Exporting and Import VSLS configurations from/to comma separated value (CSV) text files
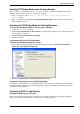
To work with the vsx_util vsls command:
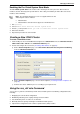
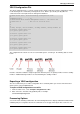
1. Run vsx_util vsls from the Expert mode on the management server
2. Select the desired choice from the VSLS menu
Enter Administrator Name: aa
Enter Administrator Password:
Enter VSX cluster object name: vsx
VS Load Sharing - Menu
________________________________
1. Display current VS Load sharing configuration
2. Distribute all Virtual Systems so that each cluster member is
equally loaded
3. Set all VSs active on one member
4. Manually set priority and weight
5. Import configuration from a file
6. Export configuration to a file
7. Exit
Enter redistribution option (1-7) [1]:
Distributing Virtual Systems Amongst Members
The primary advantage of VSLS is the ability to distribute active, standby and backup Virtual Systems
amongst cluster members in order to maximize throughput and user response time. You can choose to
distribute Virtual Systems according to one of the following options:
Automatically distribute active Virtual Systems amongst cluster members so that all members are
equally loaded based on assigned weights and existing or default priority definitions.
Automatically place all active Virtual Systems on the same member
Manually define priorities and weights for each Virtual System
Distributing Virtual Systems for Equal Member Loading
To distribute Virtual Systems for equal member loading:
1. From the VSLS menu, select "2. Distribute all Virtual Systems so that each cluster member is
equally loaded".
2. At the "Save & apply configuration ?" prompt, enter "y" to continue.
The process update process may take several minutes or longer to complete, depending on the quantity of
Virtual Systems and cluster members.
Placing All Active Systems on the Same Member
1. From the VSLS menu, select "3. Set all VSs active on one member".
2. When prompted, enter the number corresponding to the member designated as the primary member.
3. When prompted, enter the number corresponding to the member designated as the standby member.
All other members will be designated as backup members.
4. At the "Save & apply configuration ?" prompt, enter "y" to continue.
The process update process may take several minutes or longer to complete, depending on the quantity of
Virtual Systems and cluster members.
Manually Assigning Priorities and Weights for a Single Virtual System.
You can modify these settings in one of two ways: