SHOWTIME USB MICROPHONE USER MANUAL
Features • • • • • • • • • • • • • • • Pro audio broadcasting desktop microphone USB powered ‘Plug-and-Play’ operation Polar pattern selectable Connects to your computer for hassle-free sound control Used for podcasts, gaming, streaming, recording, audio editing Lab tested for stage & studio-quality performance Crisp vocal pickup, high-precision audio clarity Convenient mic mute button (lights & grille turn red when active) Selectable 6-color LED light effect (with off option/ECO mode) 3.
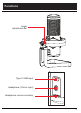
Functions Angle adjustment dial Type C USB input Headphone (3.
Dual function button A. Turn left to right to increase gain B. Mode (Push down - switch polar pattern) LED light controller A. Multi-color Ambient LED switch B.
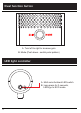
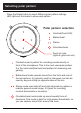
Selecting polar pattern Press the Mode button to select different polar pattern settings. LED lights will illuminate to show each pattern. Polar pattern selection Cardioid(Front LED) Bidirectional Stereo Omnidirectional Touch to mute (lights & grille turn red) Cardioid mode is perfect for recording sounds directly in front of the microphone. This is the most used polar pattern. It is the most beneficial and best pattern for streaming and gaming.
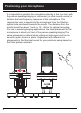
Positioning your microphone It is important to position the microphone directly in line (on axis) with the person speaking/singing or instrument (or other sound source) to achieve the best frequency response of the microphone. This requires the user to speak into the microphone from the Stadium symbol side positioned towards the mouth. The distance from the mouth should be about 1 inch, or 10 - 40mm for optimal recording.
Additional Information Selecting software You have many choices in recording software. Audacity, available for free online at http://sourceforge.net is a widely used software program that provides basic recording software. Setting your software levels Correct adjustment of microphone level is important for optimum performance. Ideally, the microphone level should be as high as possible without overloading the input of your computer.
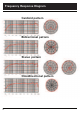
Frequency Response Diagram Cardioid pattern Bidirectional pattern Stereo pattern Omnidirectional pattern 8
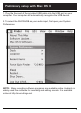
Preliminary setup with Mac OS X 1. Plug the free end of the provided USB cable into the USB port on your computer. Your computer will automatically recognize the USB device. 2. To select the SHOWUSB as your audio input, first open your System Preferences NOTE: Many recording software programs are available online. Audacity is widely used free software for recording and editing sounds. It is available online at http://sourceforge.
Preliminary setup with Mac OS X (continued) 3. Next, click Sound to display the Sound Preference panel. 4. Click the input tab and select the SHOWUSB as the device for sound input. SHOWUSB USB Your preferences are now set to use the SHOWUSB on your Mac with Garage Band or another recording program of your choice.
Preliminary setup with Windows XP 1. Plug the free end of the provided USB cable into the USB port on your computer. Your computer will automatically recognize the USB device. 2. To select the SHOWUSB as your default recording device, begin at your START menu. 3. Select Control Panel.
Preliminary setup with Windows XP 4. Select Sounds and Audio Devices.
Preliminary setup with Windows XP (continued) 5. Select the Audio tab, and choose SHOWUSB as the default device. 6. Adjust computer volume by clicking on the Volume button beneath Sound recording Default device. 7. Through the Wave In window, you can set the computer volume or mute the microphone. SHOWUSB SHOWUSB 8. Your preferences are now set to use the SHOWUSB with Windows XP with the recording program of your choice.
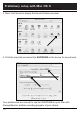
Preliminary setup with Windows Vista 1. Plug the free end of the USB cable into the USB port on your computer. Your computer will automatically recognize the USB device. 2. To select the SHOWUSB as your default recording device, begin at your START menu. Select Control Panel 3. Select (double-click) Sound Microphone SigmaTel C-Major Audio Working Microphone SHOW USB Mic Working 5. Select the Recording tab. Make sure that the SHOWUSB microphone is set as the default recording device.
Preliminary setup with Windows 7/10 1. Plug the free end of the USB cable into the USB port on your computer. Your computer will automatically recognize the USB device. 2. START menu > Control Panel > Sound To select the SHOWUSB as your default recording device, begin at your START menu.
Preliminary setup with Windows 7/10 4. Select Sound 5.
Preliminary setup with Windows 7/10 (continued) 6. Select the Recording tab, and choose SHOWUSB as the default device. 7. Double click on the SHOWUSB icon to open the Microphone Properties window. Select the levels tab to adjust microphone level (loudness). You may need to come back to this window to readjust the level after you begin recording. Microphone SHOWUSB-Mic Default Device Your preferences are now set to use the SHOWUSB with Windows 7/10 with the recording program of your choice.
System Requirements † Macintosh: Mac OS X; USB 1.0 or 2.0; 64 MB RAM (minimum); Windows: XP/Vista/Windows 7; USB 1.0 or 2.0; 64 MB RAM (minimum) Please go to the website www.stadiumsound.com.au for current updates and more information on STADIUM products. † Specifications are subject to change without notice. Inclusions 1 x Professional USB microphone with table stand 1 x USB C to USB A cable (length 2.