
Manual

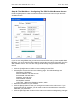
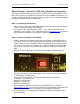
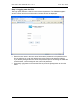
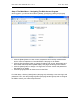
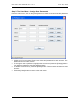
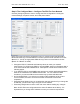
Table Of Contents
- INTRODUCTION
- HOW TO USE THIS MANUAL
- INSTALLATION CHECKLIST
- INSTALLATION GUIDE
- Preparation
- Hardware Installation
- Serial Setup – Access The PDU Using The Serial Connection
- Step 1: Download the PDU Serial Access Program
- Step 2: Connect the Computer to the PDU
- Step 3: The Main Menu – Navigating The Serial Access Program
- Step 4a: The Configure Menu – Configuring The PDU For SEMA Or SNMP
- Step 4b: The Web Menu – Configuring The PDU For Web Browser Access
- Step 5: The Monitor Menu – Monitoring The PDU With A Serial Connection
- Ethernet Setup – Access The PDU Using The Ethernet Connection
- Step 1: Configuring the Browser
- Step 2: Connect the PDU to the Network
- Step 3: Logging onto the PDU
- Step 4: The Main Menu – Navigating The Web Access Program
- Step 5: The User Menu – Assign User Passwords
- Step 6: The Configure Menu – Configure The PDU For Your Network
- Step 7: The Monitor Menu – Monitoring The PDU Using A Web Browser
- TROUBLESHOOTING GUIDE
- APPENDIX
CPI PDU User Manual Rev. 10.0. June 28, 2010
26
Step 4: The Main Menu – Navigating The Web Access Program
Once logged in, you will see four buttons: [Status], [Configure], [Users] and [Logout].
• Click the [Status] button to view current, temperature and humidity measurements
and to control receptacles on Controlled PDUs. See page 31 for details.
• Click the [Configuration] button to change IP settings, set current, temperature and
alarm limits and setup alarms (SNMP traps). See pages 28 through 30 for details.
• Click the [Users] button to assign or change user accounts: names and passwords.
See page 27 for details.
• Click the [Logout] button to disconnect from the PDU.
For initial setup, click the [Users] button (see page 27) and assign a new user login and
password. Then, click the [Configure] button (see page 28 through 30) and re-configure
the PDU to match your network requirements.