
Manual

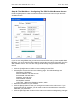
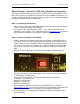
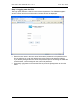
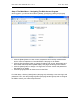
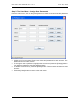
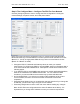
Table Of Contents
- INTRODUCTION
- HOW TO USE THIS MANUAL
- INSTALLATION CHECKLIST
- INSTALLATION GUIDE
- Preparation
- Hardware Installation
- Serial Setup – Access The PDU Using The Serial Connection
- Step 1: Download the PDU Serial Access Program
- Step 2: Connect the Computer to the PDU
- Step 3: The Main Menu – Navigating The Serial Access Program
- Step 4a: The Configure Menu – Configuring The PDU For SEMA Or SNMP
- Step 4b: The Web Menu – Configuring The PDU For Web Browser Access
- Step 5: The Monitor Menu – Monitoring The PDU With A Serial Connection
- Ethernet Setup – Access The PDU Using The Ethernet Connection
- Step 1: Configuring the Browser
- Step 2: Connect the PDU to the Network
- Step 3: Logging onto the PDU
- Step 4: The Main Menu – Navigating The Web Access Program
- Step 5: The User Menu – Assign User Passwords
- Step 6: The Configure Menu – Configure The PDU For Your Network
- Step 7: The Monitor Menu – Monitoring The PDU Using A Web Browser
- TROUBLESHOOTING GUIDE
- APPENDIX

CPI PDU User Manual Rev. 10.0. June 28, 2010
24
Ethernet Setup – Access The PDU Using The Ethernet Connection
This section explains how to access, configure, and monitor (control) the PDU using an
Ethernet connection and a networked computer with a Java-capable Web Browser. You
can also use Ethernet Setup to configure the PDU so that it can be accessed with SEMA
or SNMP with a different application/appliance.
Step 1: Configuring the Browser
• Verify that you have a Java-capable Web Browser such as Internet Explorer, Mozilla
Firefox, or Opera installed on your computer.
• Verify that the Java VM (JRE) version JRE 1.4.2_04_b05 or a newer version is
installed on your computer. If not, download the file from www.java.com
and install it.
• Verify that Java is enabled in your browser’s preferences/options.
Step 2: Connect the PDU to the Network
• Create a network that includes the PDU and your computer. Isolate the PDU and
computer from the main network during initial configuration. All CPI PDUs come pre-
configured with the same IP address. Attaching multiple PDUs to the main network
may cause connection issues. Instead, use a crossover cable to connect the PDU
directly to the computer or a use small hub or switch to connect the computer and
PDU.
• Be sure the PDU is attached to the network via the ENET port and powered on.
• Connect the computer to the same network. Your computer and the PDU should be
on the same sub-net (Netmask).
• Verify the PDU’s IP address. The factory-assigned default IP settings are:
IP Address = 192.168.123.123
Netmask = 255.255.255.0
Gateway = 192.168.123.1
• Open your web browser.
• Type the PDU’s IP address in the web browsers address bar. For example:
http://192.168.123.123
. If you already changed the IP address with Serial Setup prior
to accessing the PDU with a web browser, use the assigned IP Address.
• If Java is enabled in your web browser preferences/options, the PDUWeb’s login
panel will display.