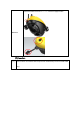
CHASING F1 PROTOTYPE INSTRUCTIONS 1. Packing list Name qty Mark Watercraft 1 standard Small camera probe 1 standard, include bolt and lead pendant Antenna 2 standard Battery 1 standard Charger 1 standard Sonar stand 1 standard Packing Box 1 standard Bait Boat 1 Non standard 2.
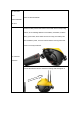
, download and Please contact CHASING install CHASIN G GO2. Install the battery filled to the bottom of the water boat corresponding position, when installing attention to the battery orientation, load the battery, press hard, when heard the sound of crisp, the battery has been installed in place, check to confirm that the red ring of the fast buckle is correctly buckled in. 3, Install the machine ②Screw the antenna into the antenna mounting seat and tighten it.
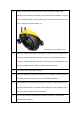
Connect the probe and the watercraft a) Check that the cable of the lamp at the probe is connected to the probe interface and is fastened in place ( shown in 1); ) b ) Connect the connector of the watercraft to the probe cable socket (shown in 2) and tighten the nut. c) Clamp the cable clip of the watercraft to the probe (shown in 3), align with the mounting hole, and then forcefully insert the cylinder bolt into the hole.
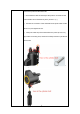
Press the switch (at the red circle in the figure), the power light on the switch lights up and the direction light will flash. Connect your phone's Wi-Fi to the machine and open the APP to operate it. Connect the sonar bracket to the watercraft. Clip the sonar bracket connector to the watercraft and move it slightly to make sure it wont detach.
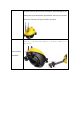
Connect the bait boat to the watercraft with the equipped cable Bait Boat (二) Precautions (1) Don't confuse mis-insertion with the probe rear infrared lamp mount and data cable plug.
(2) Battery compartment disassembly method: when installing the battery, pay attention to the orientation of the battery, and ensure that the installation is in place, when removing the battery, press the limit snap on the battery in the direction of the arrow in the figure to pull the battery out.
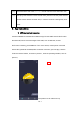
(8) The socket at the end of the watercraft should cover the cover when not in use (9) If the plug of the machine is touched with water, please turn off the power first and use the towel to absorb the water stain, in case the machine is damaged by short circuit. 3. App Instructions 1) APP download and connection Contact CHASING to download and install the App.
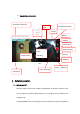
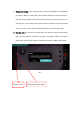
2) App interface Introduction Click here to hide and Number of GPS star Depth The current mode Temper Battery Device connection status Settings Course light Video recording Probe Probe position Picture rewinding Attracting Pic 2 Probe retracting Probe releasing lock/unlock 4.
to indicate that the light is on, click again, the icon darkens and the light is off. 2) Picture and video Photos can be taken while recording 3) Wind-up and Wind-down Manual The speed of the probe releasing and retracting can be controlled by adjusting the slider, more closer to the end of sides, more faster.
5) Return point setting:Click "Unlock" button, and a pop-up appears on the interface, as shown in Picture 3. At this time, click "Confirm Settings" as shown in Picture 3, and then set the position of the machine at this time as the turn-back point. If you click "Ignore", you can set the return point when the machine moves to the position where you want to return.
Pic 4 7) Add fishing point Click the "Fishing point Function" button, and the interface as shown in Figure 5 will appear. Click the "fishing point Add" button, and the interface as shown in Figure 6 will appear. You can name the fishing point and add notes according to your personal needs.
Pic 6 Go the fishing points:Click “Go Here” in the list of fishing points and the machine will go to the corresponding fishing point. 5. Machine control After connecting the mobile phone to the machine, put the machine into the water, unlock the propeller, and touch the left and right margins of the mobile phone display with your finger. Then the icon as shown in Figure 7 appears.
(1) forward/backward 。 (2) left/right (3) Pan left/right 6.
1. Loosen the screw 2.remove the cover and pull out the TF card Pic 8 (2) Open CHASING GO2 App, enter the Media from the main interface. Find the video/photo that you want to download. Click the download button and the image will be saved directly to the phone/tablet's photo album (Download folder).
Share Picture editor Download Download Delete Delete Pic 9 Pic 10 Product Parameters Product CHASING F1 Name Size(mm) 278x154x215 Weight 2KG Max Depth 28M Wire Length 28.
Battery Cycle Times >300 Times Working Temperature ‐10℃~45℃ CMOS 1/2.8 Light Ring F2.0 Focal Distance 0.5m ISO Range Viewing Angle Camera 100‐3200 164.6° Photo Maximum Two‐mega‐pixel(1920*1080) Resolution Photo Form Video Resolution JPEG 1080P@30Fps 720P@30Fps Video Maximum Bitstream 4M Video Form MP4 IMU Depth Sensor Triaxial Gyroscope / Accelerometer / Compass <±0.25m Sensor Temperature Sensor GPS Power <±2℃ ±1m 1.8A/12.6V Charger Charging Time LED IR Infrared Light 2.
FCC/ISEDC Statement This device complies with part 15 of the FCC Rules. Operation is subject to the following two conditions: (1) This device may not cause harmful interference, and (2) this device must accept any interference received, including interference that may cause undesired operation. Any changes or modifications not expressly approved by the party responsible for compliance could void the user's authority to operate the equipment.