
User guide


IOPRINT+ Print Servers
BiAdmin - NetWare Configuration with Client 32
Page 166
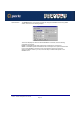
Printer button 1. After selecting Printer above, the NetWare printer objects (1 for each port on the
IOPRINT+ Print Server) will be created if they do not yet exist.
2. The next screen (shown below) allows you to select the desired port on the IOPRINT+
Print Server. This also selects the printer object. You can NOT change the printer object
associated with the port.
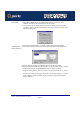
3. After selecting the desired port, you will see a screen like the following example.
Assigning Printer
Queues (Required)
Use this screen to assign queue(s) to the printer object associated with the selected port.
This screen displays the name of the NetWare Printer on the top of the screen.
Queues serviced by this NetWare printer are listed on the left, and other queues on the right.
• Create a new queue by clicking New Queue. Enter the name in the dialog.
• Assign an existing queue by selecting a queue on the right, and clicking the "<<" button.
• Stop servicing a queue by selecting it from the list on the left, and clicking the ">>" button.
• When a Queue on the left is selected, the Users, Operators, and Information buttons
become available.