
User guide


Windows Peer-to-Peer - NetBEUI
Page 108
Chapter 2 Installation and Configuration
Pserver Configuration
Before you can print using the printers connected to your IOPRINT+ Print Server, both
Pserver and Windows must be configured. To configure Pserver, following the instructions
below.
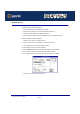
1. Start the Pserver program.and then select the Printer Menu and choose Add.
The Add Printer screen, like the example below, will appear.
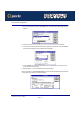
2. Enter the configuration data:
Item Description
Device Name Click Browse and select the correct IOPRINT+ Print
Server. The name shown will be in the form SCxxxxxx (SC
followed by 6 digits), as shown on a label on the base of
the IOPRINT+ Print Server. The name can be changed if
you wish, but it is only visible when configuring the device.
Select Device Port Select the IOPRINT+ Print Server port that the printer is
connected to (e.g. Parallel port 1).
Port Name On multi-port devices, each port must have a unique name
(8 alpha-numeric characters). The Port Name will be
shown in the Printer's properties. Use a name which
indicates the port used (e.g. Par_1)
Location Enter the location of the IOPRINT+ Print Server.
Enable Banner Select this option to enable a banner page.
PostScript If using a PostScript Printer, check this box.
User Name The name to be printed on the banner page.
Retry Interval Sets how often Windows will poll the IOPRINT+ Print
Server to establish a connection when the printer is busy.
Values range from 40-110 seconds.