
Assembly Instructions


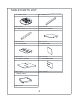


Please make sure you have all parts before begining assembly. Please wait
until all steps are completed before tightening bolts. We recommend two
people to assemble.
A Phillips head screwdriver is necessary for assembly.
5. Care: Wipe with a damp cloth. Use furniture polish or lemon oil on the
wood as needed. Avoid prolonged exposure to moisture.
4. Not for commercial use.
3. Make sure all bolts and nuts are tightly fastened before the product is used.
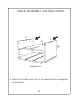
2. To avoid damages, assemble this product on a non-abrasive surface such as carpet.
1. Please read the assembly instructions prior to assembling this product.
GENERAL INFORMATION, TIPS & TRICKS
2
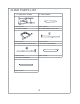
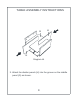
1 2
1. Insert the "T" nut into the larger predrilled hole in one
panel, making sure its center hole is facing toward the hole
through which the bolt will attach. Be sure the top of the "T"
nut with the slots out. You can adjust the direction its center
hole faces once it's in the hole using a Phillips screwdriver.
2. Attach both panels by inserting the bolt through the
predrilled hole of the second panel and screwing it into the
"T" nut.
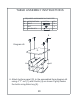
1 2
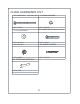
4
3
1. Screw the metal dowel screw into the predrilled plastic hole.
2. Attach both panels. Ensure the head of the metal dowel
screw is centered in the predrilled hole of the second panel. If it
is not, then screw it in farther or back it out until the head is
centered.
3. Insert the cam lock into the predrilled hole over head of the
metal dowel screw. Use a Phillips screwdriver and turn the cam
lock until tight, which is about one-half turn. Remember -
completely tighten cam locks only after the entire unit is
assembled.
Do not put hot pots or objects which are more than
Fahrenheit 80 degrees directly on the table.
Note: Over-tightening may result in the cam lock breaking. The
cam lock is locked after half-a-turn or 180 degree turn.