
Installation Instructions


Pg.
#4
NOTE:
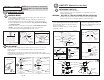
All set screws must be checked and
retightened where necessary, before and after
installation.
MOUNTING OPTION
CAUTION
Upper Jam
Screw
Upper Jam
Screw
Do not loosen two lower jam screws
Bolt
Yolk
Yolk
Nut
Flat Washer
Lock Washer
Cotter
Pin
INST
INST
ALLA
ALLA
TION
TION
DOWNROD MOUNT
- Using a Philips screwdriver loosen the two upper jam screws on the yoke.
- Position downrod inside canopy.
- Route wires exiting yoke on motor through ceiling canopy and downrod.
- Position downrod/canopy into yoke and align holes in yoke and downrod.
- Insert bolt through hole in yoke and downrod.
Be
careful
not
to
damage
or cut the fan wires.
- Tighten flat washer, lock washer, and nut and bolt (not included on some
models). Secure with cotter pin through hole in the end of the bolt.
- Secure downrod in position by tightening upper jam screws.
1.
A
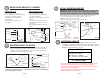
FLUSH MOUNT
- Remove the yoke screws and lockwashers which correspond to the holes
- Optional for some models -Remove rubber ring from canopy (see Fig. 2d)
in the canopy.
- Position canopy over the holes on motor and secure with the same screws
and lockwashers removed in the previous step. Ensure to place the rubber bushing
between the canopy and motor.
B
Motor
Rubber Bushing
Canopy
Yoke Screws
& Washers
Motor
Canopy
Yoke Screws
& Washers
Rubber Bushing
Canopy
Rubber
ring
Fig. 2a
Fig. 2b
Fig. 2c
Fig. 2e
Fig. 2d
Fig. 2f
Optional for
some models
8.
A
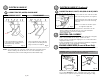
LIGHT KITS (Optional in some fans)
DETACHABLE LIGHT KITS
- Remove light kit screws and washers.
- Connect polarized connectors of light kit to corresponding connectors
found in switch housing.
WARNING: BE SURE TO TURN OFF POWER
BEFORE INSTALLING
- Carefully tuck electrical wires back into switch housing, align light kit with
switch housing and secure with three light kit screws and washers.
- Place shades on light kit and secure with either
screws, finger tight, spinner nut or
push and turn
for pop-off
style shades. (See Fig.10a, Fig.10b,
Fig.10c,10d, Fig.10e).
- Install proper wattage and type of bulb identified
on light kit or shade.
Motor
Red or Blue
Wires
Light Kit
Screws
Light Kit
Screw
Light Kit
Light Kit
Black or Blue
Wires
Switch Housing
Switch Housing
Switch Housing
White Wires
Lock washer
or
Shade
Thumb
Screw
Light Kit
Light Kit
Shade
Push and
Turn
Fig. 10a
Fig. 10b
Fig. 10c
Fig. 10e
Fig. 10d
- Install proper wattage and type of bulb
identified on light housing or shade.
- Place glass on light housing and secure
(See Fig. 10f, Fig.10g).
Glass
Fixture Socket
Spinner Nut
Tool
Tool
Spinner Nut
Spinner Nut
Light Kit
White wire
White wire
Red or Blue Wires
Black or Blue Wires
Pg. #9
White wire
White wire
Light kit
screws
Glass
Decorative
cover
Finial
Fibre washer
Nut
Fig. 10g
Fig. 10f
Rubber
washer
Steel
washer
Red or Blue
Wires
Black or Blue
Wires
Fibre washer
(Optional)