
Use and Care Guide


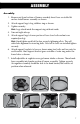

ASSEMBLY
Assembly:
1. Remove nut from bottom of burner assembly. Invert base on stable flat
surface. Install burner assembly as shown.
2. Attach support legs to leg stabilizer ring as shown.
3. Tighten securely.
Hint: Legs attach inside the support ring with nut inside.
4. Turn unit right side up.
5. Attach support legs to lower portion of base (two bolts and nuts are
required per leg).
Hint: Hand tighten each bolt before securely tightening all six. This will
aid in hole alignment for inserting bolts. After all six bolts are installed tighten
securely.
6. Attach support brackets to base as shown using two bolts and two nuts for
each bracket. Hint: Support bracket goes on inside of outer ring and in the
lower holes as shown.
7. Install adjustable air regulator over gas burner intake as shown. Thread male
brass assembly into female portion of burner assembly. Tighten securely.
Air regulator assembly should be able to be hand turned, but hold its set
position when released.
1 2 3
4 6 7 7
7