
Use and Care Guide


Safety timer:
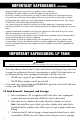
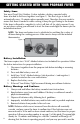
Your new Chard 30qt Outdoor Cooker includes a battery operated safety
timer attached to the hose/regulator (see Figure 1). The flow of gas is shut off
automatically every 15 minutes unless manually reset. Therefore, the user needs to
ensure that timer is tended to while cooking to keep the gas flowing to the burner.
If the timer is allowed to complete its cycle it will shut off for safety reasons. If you
are not done cooking you will need to reset the timer and relight the burner per the
included instructions.
NOTE: The timer mechanism is not a substitute for watching the cooker at
all times during the cooking process. Make sure to always use the included
thermometer.
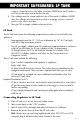
Battery Installation:
The timer requires two “AAA” alkaline batteries (not included) for operation. Follow
the below instructions for proper installation.
1. Disconnect regulator from the propane tank before installing or removing
batteries.
2. Press and slide battery cover off.
3. Install two “AAA” alkaline batteries. Match positive (+) and negative (-)
symbols located on the case and batteries.
4. Replace the battery cover.
5. If the red “Low Battery” light becomes lit during use add new batteries
Battery Warnings and Cautions:
1. Always read and follow the battery manufacturer’s instructions.
2. Keep batteries away from small children. If battery is swallowed consult a
physician immediately.
3. Dispose of batteries safely, following local guidelines.
4. Improperly installed batteries may result in leaks and/or possible explosion.
5. Remove batteries from product after each use.
NOTE: Batteries which are not removed from this device will eventually
corrode and may cause the timer to malfunction. If the batteries were not
removed and/or if the unit has been stored outdoors, test the timer for proper
operation. Follow procedure number 6 on page 5 of this guide. The green light
(steady for 10 minutes and blinking for a further 5 minutes) will then go off
showing that the timer is operating properly and you may proceed to use the
GETTING STARTED WITH YOUR PROPANE FRYER
Figure 1
8