
Owner Manual
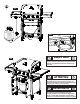
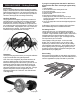

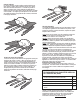
Table Of Contents
- 1: E-F-S Cover
- 2: Eng - 1
- 3: Eng - 2
- 4: Eng - 3
- 5: Eng - 4
- 6: Eng - 5
- 7: LI INSERT ENG
- Page 8
- Page 9
- 10: WARRANTY ENG
- 11: Fre - 1
- 12: Fre - 2
- 13: Fre - 3
- 14: Fre - 4
- 15: Fre - 5
- 16: LI INSERT FRE
- Page 17
- Page 18
- 19: WARRANTY FRE
- 20: Spa - 1
- 21: Spa - 2
- 22: Spa - 3
- 23: Spa - 4
- 24: Spa - 5
- 25: LI INSERT SPA
- Page 26
- Page 27
- 28: WARRANTY SPA
- 29: ASSEMBLY START
- Page 30
- Page 31
- Page 32
- Page 33
- Page 34
- Page 35
- Page 36
- Page 37
- Page 38
- Page 39
- Page 40
- Page 41
- 42: GG_Eng
- Page 43
- Page 44
- Page 45
- 46: GG_Fre
- Page 47
- Page 48
- Page 49
- 50: GG_Spa
- Page 51
- Page 52
- Page 53
- 54: TS ENG
- Page 55
- 56: TS_Fre
- Page 57
- 58: TS SPA
- Page 59
- 60: Parts Diagram
- 61: Parts List Eng
- 62: parts List French
- 63: Parts List Spanish
- 64: Hardware
- Page 65
- Page 66
- 67: REGISTRATION PAGE
- 68: BACK COVER

41
CAUTION
Cylinder valve must face to front of cart once tank is
attached. Failure to install cylinder correctly may allow
gas hose to be damaged in operation, resulting in the
risk of fire.
Le robinet du réservoir doit être orienté vers le devant
du chariot une fois le réservoir fixé en position. Une
mauvaise installation du reservoir pourrait endommager
le tuyau à gaz, créant un risque d'incendie.
ATTENTION
Una vez que el tanque haya quedado instalado, la válvula
del tanque debe quedar orientada hacia la parte
delantera del carrito. Si no se instala correctamente el
tanque, se puede dañar la manguera de gas durante el
suministro, lo que puede ocasionar el riesgo de incendio.
ADVERTENCIA
LP Cylinder
(not included)
Réservoir de gaz
(non compris)
Tanque de gas
(no viene incluido)
22
2ND
#41
1ST
2ND
3RD
#51