463372017 Serial number See rating Label on grill for serial number. Date purchased If you have questions or need assistance during assembly, please call 1-800-241-7548.
TABLE OF CONTENTS CAUTION For Your Safety . . . . . . . . . . . . . . . . . . . . . . . . . . . . . . . . . 2-4 For residential use only. Do not use for commercial cooking. Use and Care . . . . . . . . . . . . . . . . . . . . . . . . . . . . . . . . . . . 4-9 THIS GRILL IS FOR OUTDOOR USE ONLY. Limited Warranty . . . . . . . . . . . . . . . . . . . . . . . . . . . . . . . . . 10 Assembly . . . . . . . . . . . . . . . . . . . . . . . . . . . . . . . . . . . . 29-46 Grilling Guide . . . . . . . . . . .
WARNING CAUTION Using pots larger than 6 quarts in capacity could exceed weight limit of the side burner shelf or side shelf, resulting in failure of grill cart components. Failure to follow all manufacturer’s instructions could result in serious personal injury and/or property damage. CAUTION Read and follow all safety statements, assembly instructions, and use and care directions before attempting to assemble and cook. CAUTION Some parts may contain sharp edges. Wear protective gloves if necessary.
Installation Safety Precautions LP Cylinder •Use grill, as purchased, only with LP (propane) gas and the regulator/valve assembly supplied. If your grill is Dual Fuel ready, a conversion kit must be purchased for use with natural gas. •Grill installation must conform with local codes, or in their absence of local codes, with either the National Fuel Gas Code, ANSI Z223.1/ NFPA 54, Natural Gas and Propane Installation Code, CSA B149.1, or Propane Storage and Handling Code, B149.2.
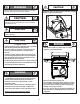
LP Cylinder Exchange Connecting Regulator to the LP Cylinder • Many retailers that sell grills offer you the option of replacing your empty LP cylinder through an exchange service. Use only those reputable exchange companies that inspect, precision fill, test and certify their cylinders. Exchange your cylinder only for an OPD safety feature-equipped cylinder as described in the "LP Cylinder" section of this manual. 1.LP cylinder must be properly secured onto grill. (Refer to assembly section.) 2.
WARNING WARNING • Do not use grill until leak-tested. • If a leak is detected at any time, STOP! Turn off gas at source and correct leak. • If you cannot stop a gas leak by closing the LP cylinder valve leave area and call your fire department! • Outdoor gas appliance is not intended to be installed in or on a boat. • Outdoor gas appliance is not intended to be installed in or on an RV. • Never attempt to attach this grill to the self-contained LP gas system of a camper trailer or motor home.
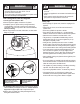
Ignitor Lighting WARNING • Do not lean over grill while lighting. 1. Turn gas burner control valves to (off). 2. Open lid during lighting or re-lighting. 3. Turn ON gas at LP cylinder. 4. To ignite, push and turn burner knob to HIGH. Immediately, push and hold ELECTRONIC IGNITOR button until the burner lights. 5. If ignition does NOT occur in 5 seconds, turn the burner controls off , wait 5 minutes and repeat the lighting procedure. 6. Repeat steps 4 and 5 to light other main burners.
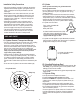
Burner Flame Check NOTE: Your grill may NOT be equipped with a Sideburner! • Remove cooking grates and heat tents. Light burners, rotate knobs from HIGH to LOW. You should see a smaller flame in LOW position than seen on HIGH. Perform burner flame check on side burner, also. Always check flame prior to each use. If only low flame is seen refer to "Sudden drop or low flame" in the Troubleshooting Section. Sideburner Ignitor Lighting • Do not lean over grill while lighting. 1.
Cleaning the Burner Assembly CAUTION Follow these instructions to clean and/or replace parts of burner assembly or if you have trouble igniting grill. 1. Turn gas off at control knobs and LP cylinder. 2. Remove cooking grates and heat tents. 3. Remove carryover tubes and hardware securing burners. 4. Detach electrode from burner. NOTE: Removal/Detachment method will depend on the burner configuration. See different configurations in illustrations below. 5.
LIMITED WARRANTY This warranty only applies to units purchased from an authorized retailer. Manufacturer warrants to the original consumer-purchaser only that this product shall be free from defects in workmanship and materials after correct assembly and under normal and reasonable home use for the periods indicated below beginning on the date of purchase*.
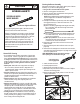
ASSEMBLY NOTE: DO NOT over tighten screws and washers that come into contact with porcelain coated surfaces. Over tightening may cause the porcelain coating to crack and break, resulting in exposed metal that will be prone to rust.
3 V x8 #42 V V V V V V V V #43 4 #50 #49 U x4 L U x4 #50 L U L L U #49 L U L U 12
5 #41 V x4 V V V V #41 13
6 #48 #60 PU EDIS SIHT 1ST G G G x2 HT PU EDIS SI N x4 THIS SIDE UP #60 2ND THIS SIDE UP N N N N 14
7 #58 M M x8 M M M #58 M M 8 #24 2ND H x2 #23 H H #25 1ST #24 15
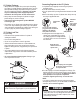
9 A x4 V x2 A #15 V A A V A 10 K x1 T x1 S x1 S T #57 CAUTION Failure to route the hose through the hose clip may allow the gas hose to be damaged in operation, resulting in the risk of fire.
11 #62 #62 #60 G G G G x3 12 A A x4 A #10 17
13 H S H x2 S x2 #9 H S S H S H 18
14 #12 #12 #12 #13 DANGER Burner must properly engage valve as shown. Failure to engage valve as shown may result in personal injury and/or property damage.
15 1ST #14 #67 #14 #67 F 2ND F x6 F F F WARNING F Flame carry over tube must be installed as shown. Failure to install as shown may result in personal injury and/or property damage.
16 #59 #59 17 #33 21
18 #34 #35 19 #36 #36 22
20 #46 21 CAUTION Failure to install grease tray and grease pan will cause hot grease to drip from bottom of grill with risk of fire or property damage.
22 D 1ST x1 E x1 J x2 Remove screws 2ND #20 #20 Secure using screws that were removed from sideburner valve bracket.
23 #29 1ST B x1 2ND #20 #29 4TH 3RD #32 B 24 #31 25
25 P x1 1ST 2ND #17 #16 P #18 3RD #32 P - + C x1 4TH - + C 26
26 #53 R x4 R R #54 1ST #55 X2 3RD PRESS 2ND #55 #52 27
27 1ST CAUTION Cylinder valve must face to the left of cart once tank is attached. Failure to install cylinder correctly may allow gas hose to be damaged in operation, resulting in the risk of fire.
If your grill is not getting hotter than 250°F to 300°F these steps should be taken first to reset the gas regulator safety device: 1. Open the grill lid. 2. Turn off all knobs on the control panel in front. 3. Turn off the tank knob. 4. Disconnect the regulator from the LP tank. 5. Wait 30 seconds. 6. Reconnect the regulator to the LP tank. 7. Slowly open the LP tank knob all the way. Do not put excessive force on the valve at the full open position to avoid damaging the valve. 8.
Indirect Cooking Indirect cooking utilizes select burners to circulate heat throughout the grill, without direct contact between the meat and the flame. The meat is placed over the burner that is 'off'. This method is generally used to slow cook large cuts of meat and poultry. A pan can be placed underneath the meat to catch grease and food drippings, and helps minimize clean-up. Food Safety Food safety is a very important part of enjoying the outdoor cooking experience.
Skewers Metal skewers should be flat, with long handles. Round skewers allow food to roll when turned, so it may not cook as evenly. Use metal skewers when cooking meat kabobs. Wooden skewers should be soaked in water for an hour before use, and are best used for quick cooking foods such as vegetables and fruits. GRILLING GUIDE – Tips & Tricks Sauces Sauces containing sugars and fats can cause flare-ups, and your food may burn. In general, apply these sauces during the final 5 minutes of cooking.
Storing Your Grill GRILLING GUIDE – Cleaning Your Grill • Clean cooking grates. • Store grill in dry location. • When LP cylinder is connected to grill, store outdoors in a well ventilated space and out of reach of children. • Cover grill if stored outdoors. Choose from a variety of grill covers offered by Char-Broil at charbroil.com. • Store grill indoors ONLY if LP cylinder is turned off, disconnected, and removed from grill. Never store LP cylinder indoors.
Gas leaking between LP cylinder and regulator connection. Gas leaking from LP cylinder valve. Gas leaking from LP cylinder. Gas leaking from cracked/cut/burned hose. Emergencies • Fire in burner tube section of burner due to blockage. • Improper installation, connection not tight, and/or failure of rubber seal in clyinder valve. • Failure of cylinder valve from mishandling or mechanical failure. • Mechanical failure due to rusting or mishandling. • Damaged hose.
Troubleshooting (continued) Problem Possible Cause Prevention/Solution • Out of gas. • Check for gas in LP cylinder. • Excess flow valve tripped. • Turn off knobs, wait 30 seconds and light grill. If flames are still low, turn off knobs and LP cylinder valve. Disconnect regulator. Reconnect regulator and leak-test. Turn on LP cylinder valve, wait 30 seconds and then light grill. • Vapor lock at coupling nut/LP cylinder connection. • Turn off knobs and LP cylinder valve.
PARTS DIAGRAM #8 #2 #6 #7 #3 #36 #1 #33 #34 #59 #35 #34 #5 #12 #67 #66 #14 #11 #4 #19 #13 #62 #46 #9 #10 #60 #43 #22 #20 #48 #47 #21 #57 #15 #51 #18 #65 #16 #17 #41 #56 #26 #28 #42 #30 #24 #25 #29 #31 #27 #23 #32 #61 #45 #53 #64 #63 #55 #53 #44 #40 #39 #50 #52 #49 #38 #37 35 #54 #58
PARTS LIST Key Key Qty Description Qty Description 1 1 TOP LID 40 1 CART FASCIA, RIGHT 2 1 LOGO PLATE F/ LID 41 1 UPPER DOOR BRACE 3 4 RUBBER BUMPER, W/ HOLE, F/ TOP LID 42 1 REAR PANEL, LOWER 4 1 HANDLE F/ LID 43 1 REAR PANEL, UPPER 5 2 BEZEL, F/ LID HANDLE 44 1 BOTTOM SHELF 6 1 THERMOMETER 45 1 WING SCREW F/ TANK 7 1 BEZEL, F/ THERMOMETER 46 1 GREASE TRAY 8 1 TOP LID HARDWARE 47 1 GREASE PAN 9 1 FIREBOX 48 2 RAIL, F/ GREASE TRAY 10 1 REAR PANEL,
HARDWARE LIST Key Description Picture Qty A 1/4-20x1-1/2" Screw 8 B Wing Nut 1 C Battery AA D Control knob 1 E Bezel f/ control knob 1 F Hitch Pin Clip 6 G #8x3/8" Sheet Metal Screw 5 H #10-24x3/8" Screw 4 J #8-32x3/8" Screw 2 K #10-24 Nut 1 L 1/4-20 Flange Nut 4 M 1/4-20x1/2" Screw (Black) 8 N #8x3/8" Sheet Metal Screw (Black) 4 - 37 + 1
HARDWARE LIST Key Description Picture Qty P Wire clip 1 R #10-24x3/4" Screw 4 S #10-24x3/8" Screw (Black) 3 T Regulator Hose Clip 1 U 1/4-20x2-3/8" Screw 4 V 1/4-20x1/2" Screw 26 38
FOR US ONLY Text “Register” to “GRILLS” (474557) ©2016 Char-Broil, LLC. Columbus, GA, 31904. Printed in China. Imprimé en China. Impreso en China. ©2016 Assembly instructions. ©2016 Assemblée des instructions. ©2016 Instrucciones de ensamblado. The product associated with this guide was manufactured in China. Le produit associé à ce guide a été fabriqué en Chine. Tel producto asociado con esta guía ha sido fabricado en China.