
User Manual
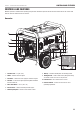


100464 - 9200W PORTABLE GENERATOR
OPERATION
19
5. Plug in and turn on the next item.
6. Allow the engine to stabilize.
7. Repeat steps 5-6 for each additional item.
NOTICE
Never exceed the specified capacity when adding loads to
the generator.
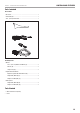
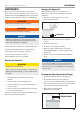
Smart Charger
The smart charger (included) is a device that is used to
charge the generator battery. The smart charger plugs into
the generator, into the DC input on the front panel, and then
into a household outlet power source. There is a light on the
charger. If the battery is in need of a charge or charging then
the red light will light up. If the battery is good and not in need
of charging or has completed charging then the green light will
light up. The smart charger is programmed not to charge or to
stop charging when the light is green. This is a safety feature
that will help prevent damage to the battery and generator.
NOTICE
If the battery is completely dead, and won’t hold a charge,
then the smart charger can be plugged into a power source
to enable power to the choke.
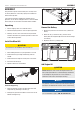
Stopping the Engine
1. Turn off and unplug all electrical loads. Never start or stop
the generator with electrical devices plugged in or turned
on.
2. Let the generator run at no-load for several minutes to
stabilize internal temperatures of the engine and generator.
3. Turn the fuel valve to the “OFF” position.
4. Let the engine run until fuel starvation has stopped the
engine. This usually takes a few minutes.
5. Press the ignition switch to the “OFF” position.
Important: Always ensure that the fuel valve and the ignition
switch are in the “OFF” position when the generator is not in
use.
NOTICE
If the engine will not be used for a period of two (2) weeks or
longer, please see the Storage section for proper engine and
fuel storage.
Operation at High Altitude
The density of air at high altitude is lower than at sea level.
Engine power is reduced as the air mass and air-fuel ratio
decrease. Engine power and generator output will be reduced
approximately 3½% for every 1000 ft. of elevation above
sea level. This is a natural trend and cannot be changed by
adjusting the engine. At high altitudes increased exhaust
emissions can also result due to the increased enrichment of
the air fuel ratio. Other high altitude issues can include hard
starting, increased fuel consumption and spark plug fouling.
To alleviate high altitude issues other than the natural power
loss, CPE can provide a high altitude carburetor main jet.
The alternative main jet and installation instructions can be
obtained by contacting our Technical Support Team. Installation
instructions are also available in the Technical Bulletin area of
the CPE website.
The part number and recommended minimum altitude for the
application of the high altitude carburetor main jet is listed in
the table below.
In order to select the correct high altitude main jet it is
necessary to identify the carburetor model. For this purpose,
a code is stamped on the side of the carburetor. Select the
correct high altitude jet part number corresponding to the
carburetor code found on your particular carburetor.
Carb. Code High Alt. Jet Part Number Min. Altitude
P29-2-H 48.131017.01.01.H
5,500 ft.
(1,676 m)
P29-2-T 48.131017.01.01.T
P29-2-F 48.131017.01.01.F
WARNING
Operation using the alternative main jet at elevations lower
than the recommended minimum altitude can damage the
engine. For operation at lower elevations, the originally
supplied standard main jet must be used. Operating the
engine with the wrong engine configuration at a given
altitude may increase its emissions and decrease fuel
efficiency and performance.