
Use and Care Manual


4
100198 ENGLISH
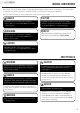
OPERATION
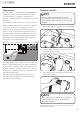
Connecting a Hose Kit
1. Attach and thread the connector to the threaded flange.
2. Slide the flexible, outlet hose over connector and
secure with the hose clamp.
Both the intake and discharge ports are 3 in.
(7.6 cm) NPT. Please insure the connectors to the
suction and discharge hose are 3 in. (7.6 cm) NPT
threaded.
NOTE
3. Attach the strainer to the intake hose and secure
with the hose clamp.
Pump Location
Place the pump in a well ventilated area. DO NOT place
the pump near vents or intakes where exhaust fumes
could be drawn into occupied or confined spaces.
Carefully consider wind and air currents when positioning
the pump.
This pump must have at least 5 ft. (1.5 m) of clearance
from combustible material. Leave at least 3 ft. (91.4 cm)
of clearance on all sides of the pump to allow for
adequate cooling, maintenance and servicing. Place the
pump on a level surface free from any obstructions or
potential hazards. The pump should be placed close to
the water level to ensure maximum pump performance.
Pump output will be affected by the type, length, and
size of the suction and discharge hoses.
The pumping height, also known as the total head, is the
distance from the water level to the point of discharge.
As this distance increases, pump output decreases. The
discharge capacity is greater than the suction capacity.
Therefore, it is important that the suction head is less
than the discharge head.
The time required to draw water from the source to
the pump (self-priming time) can be decreased by
minimizing the suction head.
TOTAL HEAD
DISCHARGE HEAD
SUCTION HEAD
When sliding hose over barbed fittings, apply thin
coating of liquid dish soap on inside of hose to
allow easier assembly
NOTE
*We are always working to improve our products. Therefore, the enclosed product may
differ slightly from the illustration.