
User Manual
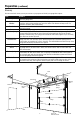
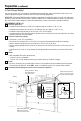
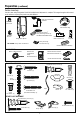
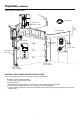

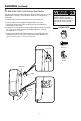
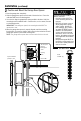
Table Of Contents
- Wall Mount Garage Door Opener Model RJO20
- Table of Contents
- Preparation
- Installation
- 1 Attach the Collar to the Garage Door Opener
- 2 Position and Mount the Garage Door Opener
- 3 Attach the Emergency Release Rope and Handle
- 4 Power Door Lock Location
- 5 Install Power Door Lock
- 6 Position the Cable Tension Monitor (Required)
- 7 Attach the Cable Tension Monitor (Required)
- 8 Install the Door Control (myQ Control Panel)
- 9 Install Remote Light
- 10 Install the Protector System®
- 11 Connect Power
- 12 Align the safety reversing sensors
- Adjustment
- Operation
- Programming
- Getting Connected
- Maintenance
- Troubleshooting
- Automatic Garage Door OpenerSafety & Maintenance Guide
- Accessories
- Warranty
- Repair Parts
- Contact Information

9
The garage door opener can be installed on either side of the door; see "Is Your
Garage Ready?" on page 4. The illustrations shown are for installation on
the left side.
1. Loosen the preset collar screws with the 3/8" open end wrench.
2. Slide the collar onto the garage door opener shaft until it stops.
3. Position the collar so the screws are facing out and accessible when
attached to the torsion bar.
4. Tighten the 2 square head set screws by hand until they contact the torsion
bar. Then, use a socket wrench to finish tightening the set screws by
turning them 1/4 - 1/2 turn.
5. Loosely attach slotted side of mounting bracket to the same side of the
garage door opener as the collar, using screws provided. NOTE: Do not
tighten mounting bracket screws until instructed.
Attach the Collar to the Garage Door Opener
1
To prevent possible SERIOUS
INJURY or DEATH, the collar
MUST be properly tightened. The
door may not reverse correctly or
limits may be lost due to collar
slip.
Collar
Motor Shaft
Set Screws
Socket
Wrench
YOU WILL NEED
Screw
#10-32 (2)
Collar
Mounting
bracket
Installation (continued)