
User Manual
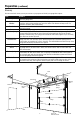
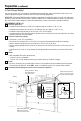
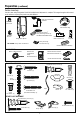
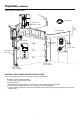

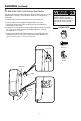
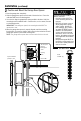
Table Of Contents
- Wall Mount Garage Door Opener Model RJO20
- Table of Contents
- Preparation
- Installation
- 1 Attach the Collar to the Garage Door Opener
- 2 Position and Mount the Garage Door Opener
- 3 Attach the Emergency Release Rope and Handle
- 4 Power Door Lock Location
- 5 Install Power Door Lock
- 6 Position the Cable Tension Monitor (Required)
- 7 Attach the Cable Tension Monitor (Required)
- 8 Install the Door Control (myQ Control Panel)
- 9 Install Remote Light
- 10 Install the Protector System®
- 11 Connect Power
- 12 Align the safety reversing sensors
- Adjustment
- Operation
- Programming
- Getting Connected
- Maintenance
- Troubleshooting
- Automatic Garage Door OpenerSafety & Maintenance Guide
- Accessories
- Warranty
- Repair Parts
- Contact Information

7
Safety reversing
sensor and bracket
Safety reversing
sensor and bracket
Door control wire
Door control
Remote light
Safety reversing
sensor wire
S
afety reversing
s
ensor wire
Door lock wire
Cable tension
monitor and wire
Overview of Installation
Preparation (continued)
ADDITIONAL ITEMS YOU MAY NEED FOR THE INSTALLATION:
Survey your garage area to see if you will need any of the following items:
• Wood blocks and/or shimming material.
- Used to mount the cable tension monitor.
• Fastening hardware.
- Alternate floor mounting of the safety reversing sensor will require hardware not provided.
• Extension brackets (Model 041A5281-1) or wood blocks and shimming material.
- Used to position the garage door opener during installation and for testing the safety reversing sensors if installed on
the wall or floor.