
User Manual
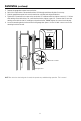
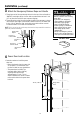
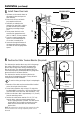
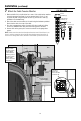
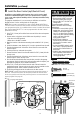
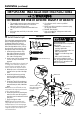

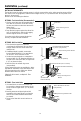
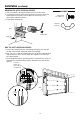
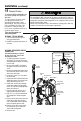
Table Of Contents
- Wall Mount Garage Door Opener Model RJO20
- Table of Contents
- Preparation
- Installation
- 1 Attach the Collar to the Garage Door Opener
- 2 Position and Mount the Garage Door Opener
- 3 Attach the Emergency Release Rope and Handle
- 4 Power Door Lock Location
- 5 Install Power Door Lock
- 6 Position the Cable Tension Monitor (Required)
- 7 Attach the Cable Tension Monitor (Required)
- 8 Install the Door Control (myQ Control Panel)
- 9 Install Remote Light
- 10 Install the Protector System®
- 11 Connect Power
- 12 Align the safety reversing sensors
- Adjustment
- Operation
- Programming
- Getting Connected
- Maintenance
- Troubleshooting
- Automatic Garage Door OpenerSafety & Maintenance Guide
- Accessories
- Warranty
- Repair Parts
- Contact Information

19
WIRE THE SAFETY REVERSING SENSORS
1. Run the wire from both sensors to the garage door opener. Securely affix
the wire to the wall and ceiling with staples (not provided).
2. Strip 7/16 inch (11 mm) of insulation from each set of wires. Separate white
from the black the wires. Twist the white wires together. Twist the white/
black wires together.
3. On the garage door opener, push the tab with a screwdriver tip to insert the
white wires into the white terminal and the white/black wires into the grey
terminal.
WHT/
BLK
Tab
Wire
WHT
MOUNTING THE SAFETY REVERSING SENSORS
1. Slide a 1/4"-20x1/2" carriage bolt head into the slot on each sensor.
2. Use wing nuts to fasten safety reversing sensors to brackets, with lenses
pointing toward each other across the door. Be sure the lens is not
obstructed by a bracket extension.
3. Finger tighten the wing nuts.
HARDWARE
Carriage Bolt
Wing Nut
Door
Wing Nut
1/4"-20 (2)
Carriage Bolt
1/4"-20x1/2" (2)
7/16
(11 mm)
Installation (continued)
To insert or
release wire,
push in tab with
screwdriver tip