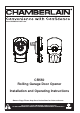
www.chamberlainanz.
START BY READING THESE IMPORTANT SAFETY INSTRUCTIONS WARNING • Failure to comply with the following instructions may result in serious personal injury or property damage. • Read and follow all instructions carefully. • The garage door opener is designed and tested to offer safe service provided it is installed and operated in strict accordance with the instructions in this manual. These safety alert symbols mean WARNING : A possible risk to personal safety or property damage exists.
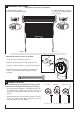
1 CARTON INVENTORY 2 TOOLS REQUIRED 1. Instruction manual (this document) 2. Warning and risk of entrapment labels 3. Hardware bag 4. Release handle, cord and risk of entrapment card 5. 3 Channel mini transmitter (2) 6. Wall or visor mounted transmitter 7. Stop collar 8. Clamp bracket and plate 9. Weight bar 10. Extension poles & brace (2) 1 2 1. Ladder 2. Adjustable wrench for U-bolts already installed on the door 3. 8mm socket, 10 mm socket and 13 mm extended socket and socket wrench 4.
TESTING THE DOOR Complete the following test to ensure your door is well balanced, and not sticking or binding: • Disable all locks and remove any ropes connected to the garage door. • Lift the door to about halfway and then release it. The door should remain suspended entirely by its spring. • Raise and lower the door to determine if there are any sticking or binding points (20 kgf is the absolute maximum allowable to raise or lower the door in any position).
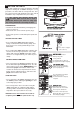
7 PREPARING THE OPENER Set opener position (left or right hand) For left hand side installations the wire jumper should be removed. For right hand side installations the wire jumper should be in place (factory installed). Extension pole Attaching the extension poles (if required) • Insert the extension poles into the gear. • Align the extension pole holes with the gear holes. • Using the screws provided, secure the extension poles.
9 INSTALLATION STEPS FOR RIGHT HAND INSTALLATIONS • Ensure that the opener position jumper (wire connector) is installed (refer Section 7). • Place the opener in manual release mode (refer Section 11). • Open the roller door fully. For safety, tie a rope around the door (as shown). • Mark the position of the door axle on the right hand door bracket. Ensure that the U-bolt on the left hand (non opener) side of the door is secure.
10 ATTACH THE RELEASE HANDLE AND CORD • Thread one end of the rope through the hole in the top of the red handle so “NOTICE” reads right side up as shown. • Secure with an overhand knot at least 25 mm from the end of the rope to prevent slipping. • Thread the other end of the rope through the loop of the manual release cable. • Adjust the rope length so the handle is no higher than 1.8 m above the floor. Secure with an overhand knot. If the door is greater than 2.
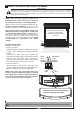
12 SETTING THE LIMITS Travel limits regulate the points at which the door will stop when moving UP or DOWN. During the set up procedure, the motor will run and operate the door. The opener must be fully installed on the door and all installation steps completed before proceeding. fig 1 The opener will operate during this procedure. Make sure the door is clear of obstruction. Ensure your hands are away from any moving parts before activating the door. www.chamberlainanz.
13 SETTING THE FORCE The force, as measured on the closing edge of the door, should not exceed 400 N (40 kg). If the closing force is measured to more than 400 N, The Protector SystemTM (IR Beams) must be installed (refer section 16). The force setting regulates the amount of power required to open and close the door. • Door should be closed before proceeding. • Press the purple button twice to enter the opener into force adjustment mode. The indicator LED will flash quickly.
16 INSTALL THE PROTECTOR SYSTEM™ (IR BEAMS) SAFETY FIRST! Whilst Chamberlain have engineered safety features into your garage door opener, we urge you to consider fitting IR Beams to your new garage door opener. In many countries these devices are compulsory to assist in preventing serious injury or property damage. For your own peace of mind and the safety of others please install this inexpensive safety device.
17 WIRELESS PROGRAMMING (OPTIONAL ACCESSORIES) NOTE: Your transmitter(s) have already been programmed into your opener. Activate the opener only when door is in full view, free of obstruction and properly adjusted. No one should enter or leave garage whilst door is in motion. Do not allow children to operate push button(s) or transmitter(s). Do not allow children to play near the door. Fix any wall control at a height of at least 1.5m and within sight of the door but away from any moving parts.
18 KEYLESS DEVICE PROGRAMMING (OPTIONAL ACCESSORIES ) Activate the opener only when the door is in full view, free of obstruction and properly adjusted. No one should enter or leave garage whilst the door is in motion. Do not allow children to operate push button(s) or transmitter(s). Do not allow children to play near the door.
19 SPECIAL FEATURES 1.Multifunction control panel Connect white/red wire to the red “wired wall control” quick connect terminal and the white wire to the white “wired wall control” quick connect terminal. 2.The Protector System™ (IR Beams) Connect both white wires to the white “safety beam” quick connect terminal and both white/black wires to the grey “safety beam” quick connect terminal. 2 1 LOCK LIGHT 20 ACCESSORIES LOCK LIGHT 1 3 2 5 6 4 7 1. Model 84330AML 1 channel transmitter 5.
TROUBLESHOOTING 1.The opener doesn't operate from either the GREEN start button or the transmitters: • Does the opener have electric power? Plug a lamp into the outlet. If it doesn't light, check the fuse box. • Have you disabled all door locks? Review installation instruction warnings on page 1. • Is there a build-up of ice or snow under the door? The door may be frozen to the ground. Remove any restriction. • The garage door spring may be broken. Have it replaced. 2.
OPERATION OF YOUR OPENER CARE OF YOUR OPENER Your opener can be activated by any of the following devices: When properly installed, your opener will operate with minimal maintenance. The opener does not require additional lubrication. • The GREEN start button Hold the button down until door starts to move. Limit and force settings: These settings must be checked and properly set when the opener is installed.
CHAMBERLAIN LIMITED WARRANTY Chamberlain CR550 Rolling Garage Door Opener Chamberlain Limited Warranty, we may, subject to your other rights and remedies as a consumer, charge you a fee to repair, replace and/or return the Unit to you. Chamberlain Australia Pty Limited / Chamberlain New Zealand Limited (Chamberlain), the manufacturer of Chamberlain® automatic garage door openers is committed to manufacturing and supplying high quality goods.