
Instructions / Assembly


2
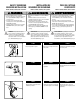
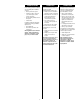
Door
Track
(A)
(Provided with
Extension Bracket)
IF ADDITIONAL DEPTH IS NEEDED
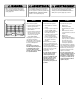
STEP 3C
ÉTAPE 3C
PASO 3C
3C
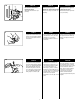
Wall installation (optional)
Fasten 2x4 to wall with lag screws (not
provided).
Instalación de pared (opcional)
Sujete el tablero 3.8 cm
(2 x 4 pulg.) a la pared con
tirafondos (no incluidos)
Montage mural (en option)
Attachez un 2 x 4 au mur avec des
tire-fond (non-fournis).
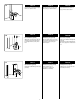
FLOOR MOUNT (RIGHT SIDE)
(A)
(B)
STEP 3B
ÉTAPE 3B
PASO 3B
3B
Floor installation (optional)
Attach with concrete anchors (A) (not
provided). Sensor beam (B) should
be no higher than 6" (15 cm) above
floor.
Instalación a piso (opcional)
Fijar con tarugos para concreto (A)
(no incluidos). Haz del sensor (B) a
no más de 15 cm (6 pulg.) por
encima del piso.
Pose au sol (en option)
Fixer au sol à l’aide des ancrages de
béton (A)
(Non fournis). Faisceau du détecteur
(B) 15 cm (6 po) max. au-dessus de
sol.
DOOR TRACK MOUNT (RIGHT SIDE)
(A)
STEP 3A
ÉTAPE 3A
PASO 3A
3A
Faisceau du détecteur (A) 15 cm
(6 po) max. au-dessus de sol.
Sensor beam (A) should be no higher
than 6" (15 cm) above floor.
Haz del sensor (A) a no más de 15
cm (6 pulg.) por encima del piso.