
Specifications


11
GB
Replacing the Saw Blade / Maintenance
MAINTENANCE
Ensure that the tool is switched off and the plug is removed
from the power point before
making any adjustments or
maintenance procedures.
•Regularlycheckthatallthe
fixing screws are tight. They
may vibrate loose over time.
•Regularlycheckthatthesaw
arbors and arbor washer
are clean, and free of built-up gum deposits or caked
on sawdust. Check that the faces of the arbor washers
are smooth and free from burrs. Check that the blade
retaining bolt is correctly tightened.
•Checktheoperationofthespring-loadedlowerguard.It
must close quickly and without scraping any part of the
tool. Remove the blade and clean accumulated sawdust
or wood slivers from the guard area.
•Occasionallycheckthetensionofthemicro-adjustment
knob, and if necessary tighten or loosen the Nyloc nut.
•Thesawventilationslotsshouldbekeptcleanandclear
of any foreign matter. Use a lightly dampened cloth to
wipe the saw clean - do not use solvents.
BLADE MAINTENANCE
•Regularlycheckthatthebladeisfreefromabuildupof
gum resins or sawdust. If necessary clean with a solvent
such as WD40, RP7 or mineral turpentine.
•Regularlycheckthesawbladeforatness.Useofthe
saw with a buckled blade places excessive load on
the motor and gearbox assembly, and may affect your
warranty rights.
•Thetungstencarbideteethshouldbecheckedregularly
for sharpness and tooth breakages, and repaired or re-
sharpened as required. Note that when re-sharpening,
the bevel angles on the front of the teeth should be
retained.
CLEANING
1. Keep the tool’s air vents unclogged and clean at all
times.
2. Remove dust and dirt regularly with a cloth or soft brush.
3. Never use caustic agents to clean plastic parts. A damp
cloth is recommended. Water must never come into
contact with the saw.
4. Re-lubricate all moving parts at regular intervals.
BRUSH REPLACEMENT
•Thecarbonbrushesareaconsumableitemwhichshould
be inspected periodically and replaced when worn.
•Withthesawdisconnectedfrompower,unscrewthe
brush caps located near the end of the motor. Remove
the brushes by pulling carefully on the protruding
springs.
REPLACING THE SAW BLADE
WARNING Ensure that the tool is switched off
and disconnected from the power supply before
making any adjustments or installing or removing
blades.
•Onlyuse185mm(7
1
⁄4") blades, with a kerf between 2.2
and 3.5mm, designed for circular saws with a no-load
speed rating of at least
5000rpm.
•Neverthighspeedsteel
blades or abrasive discs.
Fitting of other purpose or
different sized blades will void
the warranty.
• Donottinferiorblades.Regularlycheckthebladeis
at,sharpandfreeofcracksordefects.
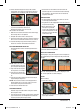
1. Ensure the saw is disconnected from the power supply.
2. Place the supplied Pin Wrench (17) inside the two holes
locatedontheouterbladeange.InsertHexKey(18)
into the hole in the blade bolt.
3. Whilst tightly holding the pin wrench, turn the hex key in
the direction of the blade’s rotation (anticlockwise). When
the blade bolt is free from the arbor hole, remove the bolt
andbladeange.
4. Hold back the Lower Blade Guard (7) completely,
carefully lift the worn blade off the inner washer on the
shaft and slide the blade through the baseplate.
5. Keeping the lower blade guard fully retracted, carefully
slide the new blade through the base plate and position it
onto the inner washer on the shaft. The graphics should
face out and the arrow on the blade should point in the
same direction as the arrow on the guard.
6.Rettheouterbladeangethenlightlyscrewtheblade
boltthroughtheouterbladeange.
7.Checkthebladesitsushbetweentheinnerandouter
angesthentightenrmlywithpinwrenchandhexkey.
330130_Z1MANPRO.indd 11 25/09/2012 14:56