
Instruction manual


The canopy may require
trimming to make space
for certain batteries or
other extras.
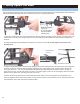
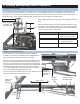
Cut the windshield of the canopy to align with the
windshield lip of the canopy. Use the supplied
hardware to attach the windshield to the canopy.
(HINT:) Use Krylon ‘Fusion’ paint if painting.
Use soap and water to clean the canopy
before applying decals. Decals are designed for
application as pictured. Mount the decals in such a
way that they do not come too close to the canopy
mounting grommets.
Mount the canopy to the front of the helicopter
using the four grommet posts as shown. Be sure
that the rotor head linkage is not obstructed and
the swashplate has room to move.
M2x5 Self
tapping
screws (5)
Canopy
grommet
mounting
for rear
post
Canopy
grommet
mounting
for front
post
Layout for decal
application
Use soap
and water
to clean
the canopy
before
applying
decals.
Preparing the Canopy
9. Final Preparations
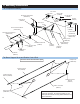
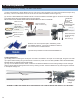
Preparing, Mounting & Tracking The Main Rotor Blades
The Main Rotor Blades included in Swift kit are pre-fi nished and wrapped wooden rotor blades. Care must be taken in han-
dling these blades to keep them in excellent condition. Do not bend or fl ex these blades by hand as the wood can be cracked
this way. In the event of a crash-landing discard rotor blades, scuffs or marks on the blade tips maybe the only visible damage
however there is no method for inspecting the internal structure of the rotor blades for stress cracks which can cause total blade
failure at an unpredictable time. Also, do not store rotor blades indoors in direct sunlight or near heat sources for any period of
time. Simply wipe blades clean after each fl ight.
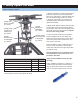
Blades rotate clockwise, so observe the leading edge. To install the blades, slide the root into the rotor grip and insert one 4mm
x 30 Shouldered Socket Cap Screw through the top grip and secure using one 4mm Locknut. Repeat for opposite rotor blade.
Blade bolt tension will affect how the blades perform. To set proper tension, start from loose blades (bolt is loose enough for
the blade to pivot freely from the grip) and tighten the bolts a little at a time until the blades will hold straight as the helicopter is
tipped on its side. Slightly tighter is good. Too tight and a vibration will occur, too loose and a tail boom strike can happen. Tail
blades can be set the same way.
Trailing Edge of Blade
Leading Edge of Blade
The Swift contains symmetrical rotor blades for sport and aerobatic
fl ying. For your convenience you can also use semi-symmetrical for
smooth aerobatics and scale fl ying.
Replacement High Performance Rotorblades Main & Tail
CN265166C Rotortech Carbon 515mm Main Blades
CN265501 Rotortech Carbon 550mm Main Blades
CN260762 Rotortech Carbon 75mm Tail Blades
CN25080 Carbon 80mm Tail Blades
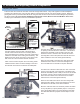
(Optional Item) CNE555 Carbon Gyro Mounting Plate can be used to mount
the gyro at the rear of the helicopter. It is extremely important that the gyro
is attached using only the supplied two sided tape onto a clean fl at surface.
Keep all wires and components away from the gyro housing. Do not use
straps or elastics to secure the gyro.
Install the gyro using double sided foam tape ( supplied with gyro ) put a full
strip along the bottom of the gyro unit and press onto the surface. For a good
bond make sure both surfaces are clean and dry.
Mounting the Gyro
19.