
Owner's Manual
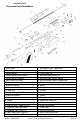

C39 Micro Pistol Manual
© 2013 Century International Arms, Inc.
Page 11
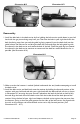
Reassembly
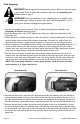
1. Install the bolt back in the bolt carrier by first holding the bolt carrier upside down in your left
hand with the gas piston facing away from you. Then take the bolt in your right hand with the
bolt face facing away from you and the guide lug facing upward. Insert the bolt shaft into the
guide hole on the bolt carrier and bring the bolt fully rearward. Align the bolt guide lug with
the channel in the bolt carrier and rotate the bolt to the left. Once the guide lug has entered
the channel in the bolt carrier continue to rotate until the bolt has moved forward as far as
possible. (See Illustration #14.)
Illustration #14
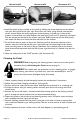
2. Make sure that the hammer is cocked (locked underneath the sear) before attempting to install
the bolt carrier.
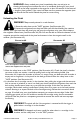
3. Install the bolt carrier and bolt back onto the receiver by holding the forward portion of the
receiver with your left hand and with your right hand take the bolt and bolt carrier as shown
in Illustration #15 ensuring that your thumb is placed on the back of the bolt to hold it fully
forward. Align the back face of the bolt carrier with the inside face of the back plate of the
receiver. Using the heel of your right hand, depress the bolt carrier against the pressure from
the hammer spring so that the guide grooves on the sides of the bolt carrier are aligned with
the rails on the receiver and move the bolt carrier to its fully forward position. (See
Illustrations #15 - #17.)
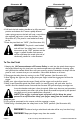
Illustration #12 Illustration #13