
Owner's Manual

1. Remove the magazine from the pistol. To do so, follow the procedures detailed in the
Unloading the Pistol section on page 9.
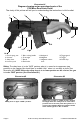
2. Move the safety lever to the "FIRE" position by rotating the safety lever downward. (See
Illustration #3.)
3. Check the pistol's chamber to ensure it does not contain a round by pulling back on the bolt
cocking handle (See Illustration #4). Inspect the chamber to ensure it is empty. Once you
determine the chamber is empty and no magazine is in the pistol, let the bolt go forward.
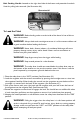
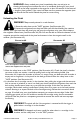
4. While maintaining a safe muzzle direction, remove the receiver cover by holding the pistol in a
secure position (across your lap, resting on a table, etc.) and grasping the rear part of the
receiver with your right hand, press the recoil spring cam forward. Then remove the receiver
cover from the back end first with your left hand. (See Illustration #10.)
5. Remove the recoil spring assembly from the pistol by holding the forward portion of the
receiver with your left hand and pressing on the back of the recoil spring cam with your right
hand until its rear face leaves the groove in the rear of the receiver. Lift the recoil spring cam
and remove the recoil spring assembly from the bolt carrier channel. (See Illustration #11.)
NOTE: The recoil spring assembly is under spring pressure. Hold on to the assembly
when removing it or injury could result.
Page 10
© 2013 Century International Arms, Inc.
C39 Micro Pistol Manual
Illustration #10
Illustration #11
WARNING! Wear eye protection, such as shooting glasses or goggles, when
disassembling your firearm to protect your eyes from tensioned parts, such as
springs that could be dislodged during disassembly.
Field Stripping
WARNING!
Before beginning the disassembly process, check to ensure the pistol
is not loaded. To do so, follow the procedures detailed in the Unloading the
Pistol section on page 9.
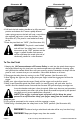
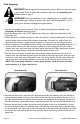
6. Remove the bolt carrier and bolt from the pistol by holding the receiver with your left hand
and the cocking handle with your right hand. Pull the bolt carrier and bolt to the rear as far as
possible. Once the back of the bolt carrier contacts the backplate of the receiver. Lift the rear
portion of the bolt carrier and remove it and the bolt from the receiver. (See Illustration #12.)
7. Remove the bolt from the bolt carrier by turning the bolt carrier over and holding it in your
left hand. (See Illustration #13.) Rotate what is now the top of the bolt to the right and move
it rearward with your right hand so that the guide lug on the bolt leaves the channel in the bolt
carrier. You can now remove the bolt from the bolt carrier by moving it forward and out of its
guide hole.