
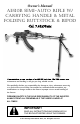
Manual
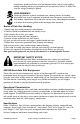

WARNING! The rifle is now loaded with a round in the chamber and the
hammer is cocked. Handle with care!
WARNING! The rifle is now loaded and will fire if the safety lever is moved to
the “FIRE” position and the trigger is pulled! Handle with extreme caution and keep
the muzzle (the end of the barrel) pointed in a safe direction!
Page 8 © 2011 Century International Arms, Inc. AES10B Rifle Manual
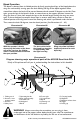
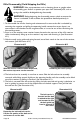
2. Press the magazine release lever (located at the front of the trigger guard) forward, to allow
you to pull and remove the magazine from the receiver. (See Illustration #7.)
3. Load the magazine with 7.62x39mm ammunition by pressing the cartridges, one at a time, into
the spring-loaded magazine’s feed lips, rear (case head) of the cartridge entering the magazine
first.
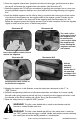
4. Install the loaded magazine into the rifle by tilting it rearward, then inserting the catch surface
at the front of the magazine into the magazine well of the receiver so that it latches on the
magazine catch surface on the front wall of the magazine well. (See Illustrations #8 - #9.)
Rotate the magazine upward and slightly rearward, until it locks into place. Pull on the magazine
slightly in order to ensure that it is locked into position.
5. Keeping the muzzle in a safe direction, move the safety lever downward to the “F” or
“FIRE” position.
6. Pull back the operating handle to its fully-rearward position and release. As it moves rapidly
forward under spring pressure, the bolt will strip a round from the magazine and insert it into
the chamber of the barrel, readying the rifle for firing. (See Illustration #10.)
7. Move the safety lever to its upward “SAFE” position.
Illustration #8
Press the magazine release lever to
remove the magazine.
Illustration #10
Pull the
operating
handle to
ensure there is
no remaining
cartridge in the
barrel chamber.
Illustration #9
The catch surface
at the upper front of
the magazine must
be mated to the
catch surface within
the magazine well
before rotating the
magazine rearward
and upward.
Pointing to the catch surface at
the front of the magazine.
Illustration #7